This user guide will show you how to create a queue to be run through NoviSign solution. Simple queue means a situation where you have an office, a clinic for example, a teller (or multiple tellers) and visitors who enter the venue, take a number from a paper roller or via connected NoviSign kiosk printer and wait for their turn.
Queue System User Guide
Overview
Note: The queue works ONLY on Android-based devices.
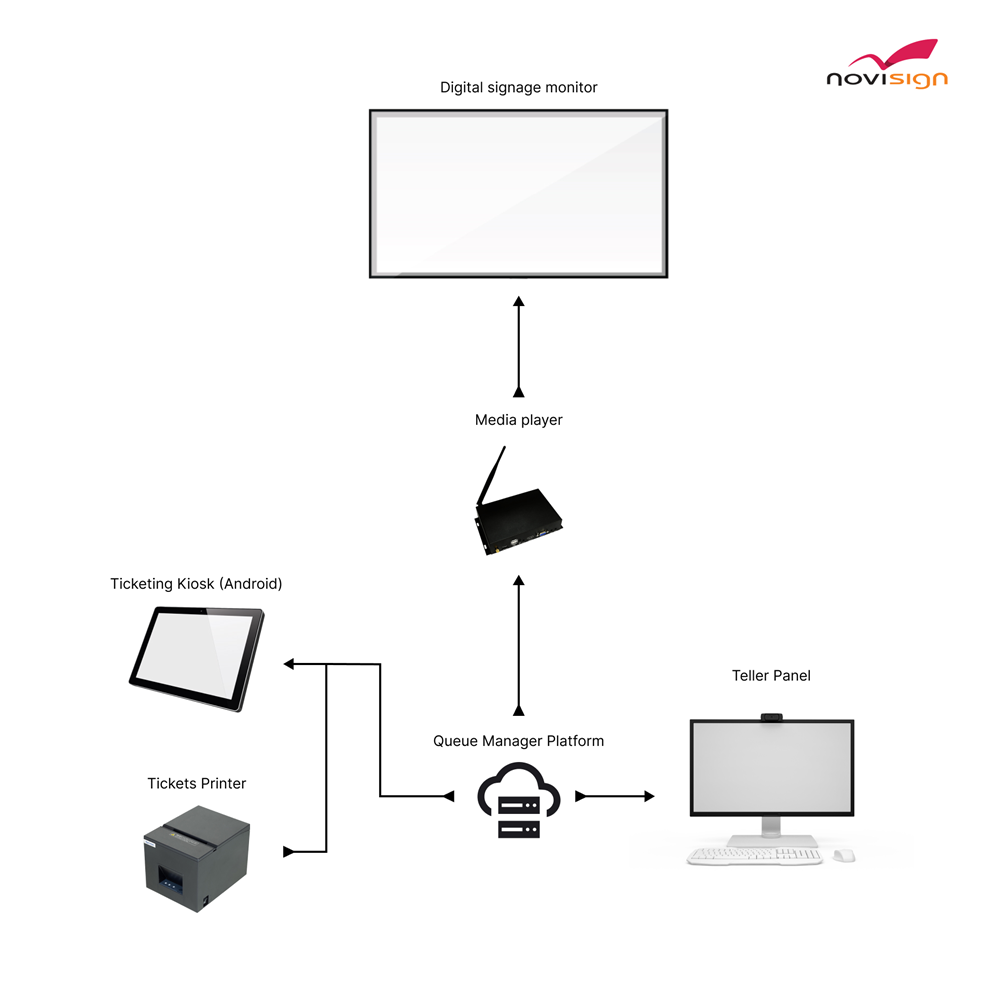
Components
The system consists of the following elements:
- Teller Interface: For managing queue flow (call the next number, ring the bell again, reset/update the queue current number, adding or deleting teller desks).
- Online Studio: Using the Custom API External Interface to inject queue data into a creative, allowing info screens to display queue updates dynamically.
- Ticket Kiosk (Optional): An Android device with NoviSign Queue Manager app connected to a thermal printer, enabling customers to get queue numbers and display wait status.
Queue System Interfaces
Two Types of User Interfaces
Please read before proceeding. NoviSign’s Simple Queue system offers two main options for displaying queue information:
- Old Interface (Embedded web-based widget):
- URL: https://queue.novisign.com/simplequeue/assets/manage.html
- Pros: Easy to configure, supports sound playback (bell ring, voice reading numbers).
- Cons: Limited design flexibility, no API-based data, supports only single teller mode.
- New Interface (Full Console View):
- URL: https://queue.novisign.com/simplequeue/assets/simplequeue/index.html?mode=player&templateId=teller-view.template.json
- Pros: Advanced configuration, API integration, multi-teller support.
- Cons: No sound effects.
Creating the Queue (Old UI)
Step 1: Open the Queue Creation Page
- Visit the Queue Creation Link.
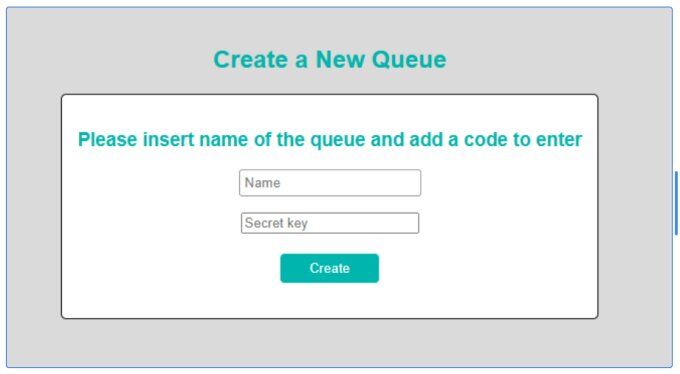
Step 2: Provide Queue Information
- Enter a Queue Name.
- Enter a Secret Key (password, avoid using the “#” character).
- Click the “Create” button.
Step 3: Access the Queue Management Page
- Access the Queue Management Page.
- Hebrew version available.
Step 4: Extracting the URL
Depending on your choice:
- Single Teller System: Use old management page for control and URL generation.
- If you choose to use a multi teller system, then the old management page can be used only to get the queue ID. Nothing beyond that.
Single Teller Queue
If your queue requires only one teller, you can use this way. You can also use the multi teller instructions (coming next) if you like a different teller’s interface.
Continue from here after you created the queue in the above instructions block and you now have a queue name and queue secret (password).
Step 1: Open the Queue Management Page
- English: https://queue.novisign.com/simplequeue/assets/manage.html
- Hebrew: https://queue.novisign.com/simplequeue/assets/manage_he.html
You do not need to login as you already did it (using the queue name and queue secret).
Step 2: Configuring Queue Settings
a. In the Queue Management page, enter the Teller Name in the textbox.
b. Build the Queue URL by clicking the “Build URL” button and configuring the following settings:
-
- Font Size: Select the desired font size for the queue number.
- Show Teller’s Name: Set to true to display the teller’s name or false to hide it.
- Show Current Number: Keep this set to true to display the queue number.
- Voice Language: Set to “en” for English or “he” for Hebrew.
- Ring a Bell: Set to true to ring the bell when the queue number is called.
- Bell Volume: Set this to 1.
- Voice Rate: Set this to 1.3.
- Min Number: Set the starting queue number (e.g., 0).
- Max Number: Set the maximum queue number (e.g., 1000).
Step 3: Generate the Queue URL
After the configuration, a generated URL will appear. Copy this URL for the next steps, as you will use it in the online Studio CMS when constructing your creative.
The URL may look like this one:
https://queue.novisign.com/simplequeue/assets/number.html?queueKey=aad4c8d3-6802-4de2-a068-eea0d4e12759&fontSize=40&showTeller=true&showNumber=true&voiceLanguage=en&bell=true&bellVolume=1&voiceRate=1.3&minNum=3&maxNum=1000
Step 4: Create Content in Studio CMS
In the Studio CMS account of yours, build a composed creative. Within it, drag an embedded (webpage) widget which will show the number in the line. Add graphics, text and whatever you’d like to be in that creative. Then drag an embedded widget (previously called “webpage” widget) to the canvas. In its URL property of the widget, paste your clipboard (holding the built URL which you’ve copied from the queue manage page).
It should look like this (with different key, of course):
https://queue.novisign.com/simplequeue/assets/number.html?queueKey=3c85a7f8-90bb-4b4a-869c-9f7d9ba0d854&fontSize=30&showTeller=false&showNumber=true&voiceLanguage=en&bell=true&bellVolume=1&voiceRate=1.3&minNum=0&maxNum=1000
Please notice that:
-
- The showTeller parameter will show or hide the teller’s name (true for showing, false for hiding).
- The showNumber parameter will show or hide the queue number.
- The voiceLanguage parameter will add sound (the number will be called; en for English numbers, he for Hebrew numbers). Not using this parameter, will result with no sound for reading the numbers.
Now, after saving this composed creative, add it as slide in a new or existing playlist, then assign it to the screen which is set in the venue and the magic is done.
Note: In the manage page, the teller should use the “+” and “-” buttons in order to increase or decrease the queue numbers. You also have 2 other buttons for resetting the queue to 1 or to any number you like.
(The “+” and “-” buttons can be also triggered by pressing the “+” and “-” keyboard keys; while pressing the Shift + R keys in your keyboard will reset the line to 1).
Multi-Teller Queue
If your queue requires more than one teller or if you prefer to use advanced features, this is the recommended method.
Continue from this point once you have created the queue following the instructions above and obtained the queue name and secret (password).
Access the new UI at: https://queue.novisign.com/simplequeue/assets/simplequeue/index.html?mode=player&templateId=teller-view.template.json
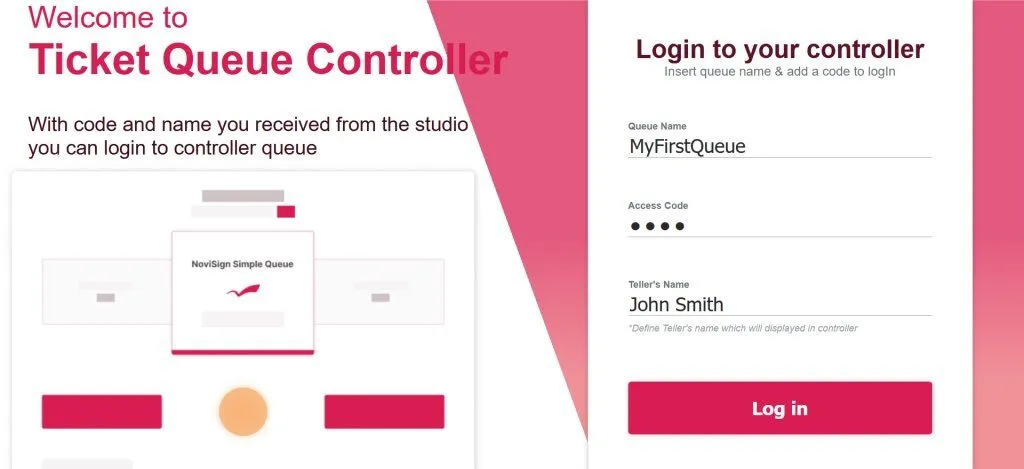
- Login with queue name and secret key (password).
-
Optionally, set the name for your first teller.
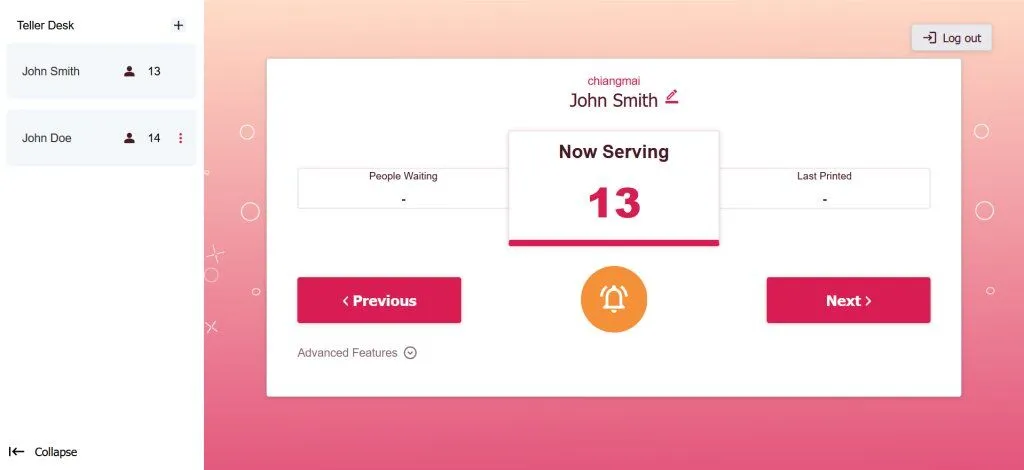
- After logging in, you’ll see a control panel for each teller.
- The left pane allows you to create/manage multiple tellers (collapsible)
- The main pane updates depending on the selected teller.
- Each teller can:
- Control his queue by calling the previous/next number
- Ring the bell
- Update the queue to a certain number
- Reset the queue
Before shifting into the content creation, you need to create a JSON payload URL of your queue in the following format:
https://queue.novisign.com/simplequeue/queue/{queueKey}/{secret} – Replace {queueKey} and {secret} with the actual values you used.
- {queueKey} is the ID (unique identifier) of your queue. It should be extracted from the URL you generated when creating the queue: in that long URL it is a long string of characters that comes after the “queueKey=” and right before the “&”.
So, if the generated URL for displaying a queue information was this:
https://queue.novisign.com/simplequeue/assets/number.html?queueKey=3c85a7f8-90bb-4b4a-869c-9f7d9ba0d854&fontSize=30&showTeller=false&showNumber=true&voiceLanguage=en&bell=true&bellVolume=1&voiceRate=1.3&minNum=0&maxNum=1000
Then the queue ID will be: 3c85a7f8-90bb-4b4a-869c-9f7d9ba0d854 - {secret} is the secret key (password) which you set for the queue when you created it.
For example: mySecretPassword
So, according the above example, the JSON payload URL of your queue should be:
https://queue.novisign.com/simplequeue/queue/3c85a7f8-90bb-4b4a-869c-9f7d9ba0d854/mySecretPassword
Write down the JSON payload URL, as you will soon use it in your Studio account and player apps.
Now it’s time to create some content that will show the queue numbers for each teller on the big screen:
- Log into your NoviSign Studio account and create a new creative or edit an existing one.
- Add some graphics and other elements to your creative.
- Add 2 text/label widgets for each teller queue. One will be for the queue name (which can be the teller’s name or else) and the other for the queue current number.
- Now, you’d like to connect your creative to the parameters coming from the JSON file which is being generated by the URL which you previously constructed. Here is what you have to do:
- Click on the canvas somewhere just to make the right pane show the creative’s general properties
- In the right properties pane, scroll down to the bottom to the “Preview” section where you can see a checkbox called “Load Preview Parameters”. Check it.
- Click “Click to change” button which is right to the “API Integration” text. This will open a popup window allowing you to add a new API integration.
- In the popup window press “Add”. Now you got the custom API integration form.
- For the “Name” you can put any name you like. For the “API URL” type the JSON payload URL which you constructed in the previous steps (in our example it will be something like: https://queue.novisign.com/simplequeue/queue/3c85a7f8-90bb-4b4a-869c-9f7d9ba0d854/mySecretPassword), and in the property key type some text to represent the tellers piece of data (can be something like: “MyOffice”). Like in the below example:
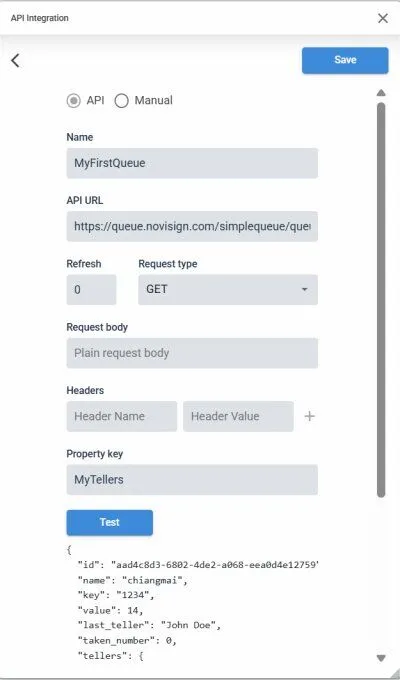
- Press the “Test” button to see if you get any correct JSON back (see the example above). If it looks valid, you can press “Save” and then “Ok”.
- Now for the the first teller do the following:
- In the text widget that is supposed to show the teller’s name, type: ${@customapi..tellers.0.teller} – in the above example it should be: ${@customapi.MyOffice.tellers.0.teller}
- In the text widget that is supposed to show the teller’s queue current number, type: ${@customapi..tellers.0.number} – in the above example it should be: ${@customapi.MyOffice.tellers.0.number}
- For the the second teller (if you have) do the same, just change “0” to “1” in the 2 above examples. If you have a third teller, do the same and change that number from “0” to “2” and so on.
- Press the “Preview” button in the Creative Composer to see that you get data on the screen. Then save the creative. Add the creative to a playlist. Assign the playlist to a screen and run that screen/key on an Android media player (or Android based smart display).
Now you have to configure your Android player app (APK) to get the information of the queue, even though it plays the creative which you have just designed. Why? Because the creative doesn’t really hold the JSON payload URL and other API information which you have set there (just for display and test purpose), as the creative is like an empty template, and the real API data should be actually be setup on the APK itself.
The way to do it in your Android player app (APK app) is this:
- Access the APK app on your Android media player.
- Click the gear icon in the top right corner to access the app’s settings.
- Scroll down to the setting called “External Interfaces” (under the “Advanced” block of settings).
- Access this setting, then click on “Custom API Integration”.
- Here create the same integration which you create in the Studio CMS (on step 4d above).
- Right-click the mouse a few times to exist the settings and then run your screen key. Everything should be right.
The remote configuration feature allows you to send a set of settings to multiple screens remotely without attending. this is instead of doing the previous step (step 5) on each Android me
 dia player. This is done remotely from your Studio CMS account one time. Here is how to do it:
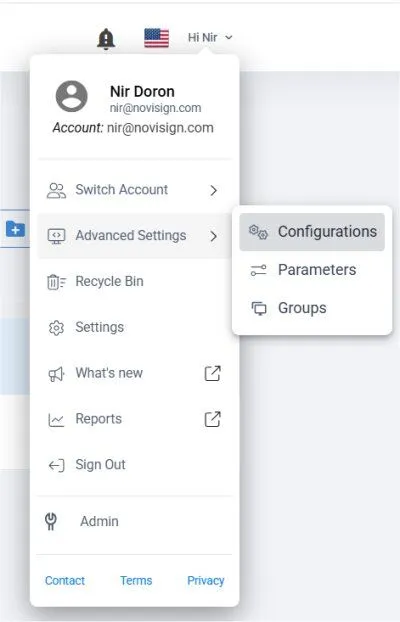
- Log into your NoviSign Studio account, click on your name in the top right corner of the screen to open menu.
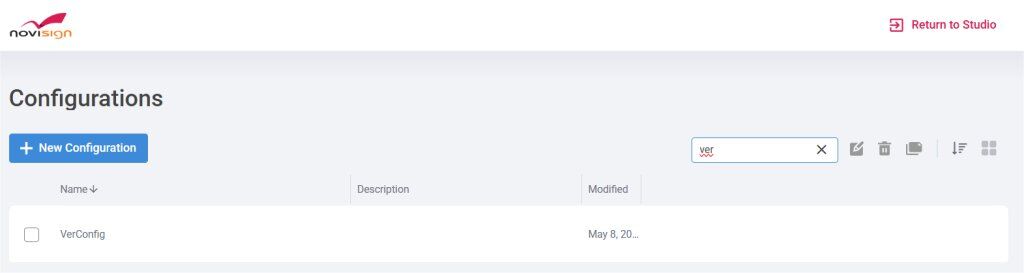
- Choose “Advanced Settings” > “Configurations”.
c. Click the “+ New Configuration” button in order to create a new configuration set.
d. Give it a name and scroll down to find the “API Integration” setting (one of the last ones).

e. Check the checkbox near this setting and the click the “Click to change” button which is right to it. A window will be opened for creating the API integration.
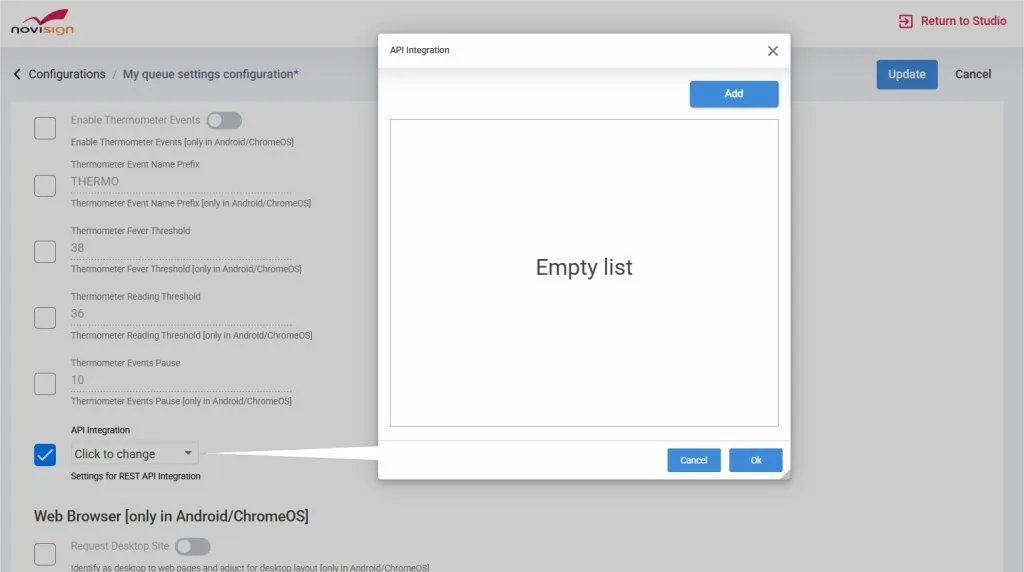
- Create the API integration by repeating same the very steps you did before in the Creative Composer (steps within clause 4D above).
- Once you’re done, press the blue “Update” button on the top to save your configuration.
- Click the “Return to Studio” red link on top and then switch to the “Screens” tab.
- For each screen you’d like to apply this configuration (for applying the queue API settings), you need to click the “Set Config” link of it, then choose the configuration which you have just created and press “OK” to assign it.
- That’s it: for each screen you assign the configuration, that screen will download this setting within 2 minutes.
Kiosk with printer
If you use a touch tablet as a kiosk, connected to a printer in order to allow visitors to take a number (a visitor touches the “take a number” soft button on the touch tablet and his queue number is immediately printed in the connected printer; actually the touch tablet replaces a printer button), you should configure it the following way:
Installing and Configuring the Kiosk Printer APK
Step 1: Install the Queue Printer APK
Download and install the latest version of the “Queue Printer” APK by NoviSign on the touch tablet. This APK should be used as a kiosk app (that means the tablet will be acting as a kiosk – dedicated 24/7 to a single app). On the touch tablet, download the latest APK from here
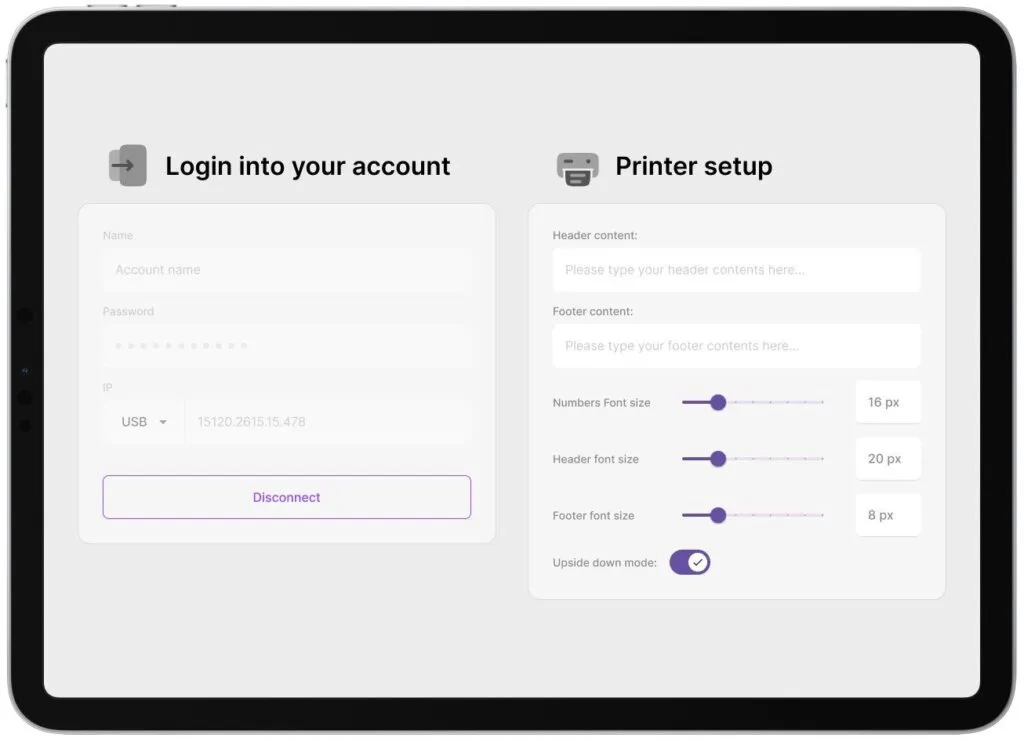
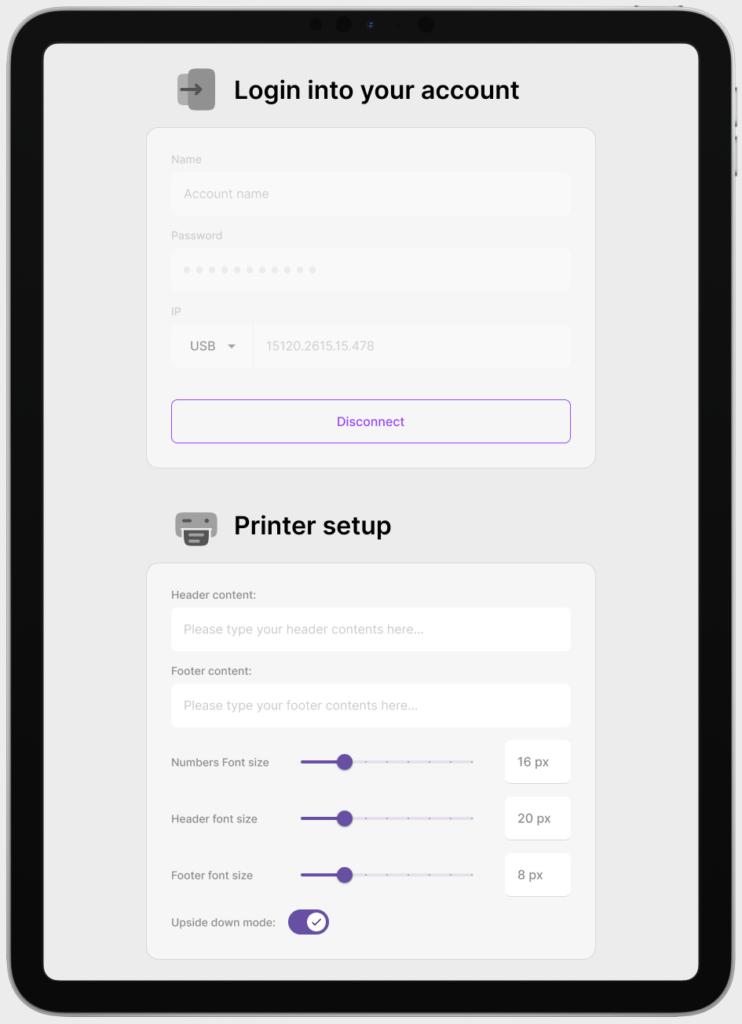
Step 2: Configure Queue Credentials
Next is to configure the queue printer app to your queue and printer. In the “Queue Name” and “Password” fields type the queue name and password as you created it. This can synchronize the tablet (which should be connected to the internet) with the queue. For example “test” and “secret”.
Step 3: Connecting the app to the to the printer
Afterwards, you need to connect the app to the printer (we were using a model called XPrinter). You should do this once you start this app. You have 5 ways to do so under the “Printer Connection” setting, but the best two are by USB cable or by RJ45 Ethernet cable (that means the XPrinter will be connected to the local network and not directly to the tablet; in this case you will have to assign it a static IP address). If you choose the USB option, wait till you see the UNC path of the printer appears right to the “Printer Connection” text. Only when you see it there, it means the tablet can “talk” with the XPrinter and you can press the purple “Connect” button below to establish the connection and move the queue app into action mode (where you’ll see the “Take a number” call to action text). If the tablet cannot identify the XPrinter, you will get an error message that says “Printer Connect Failed”. In some cases, you might need to switch the printer off and then on, in order to be identified by the app.
Step 4: Customize Printed Text and Layout Settings
Other settings which can be configured in the configuration settings screen of the Queue Printer app appears in the right pane and include text that can be planted in the header or footer of the XPrinter or to replace the default text of this app (the “Take a number” text), alter the font size of any of those texts or print everything upside down (depends how your printer is positioned).
Step 5: Verify Printer Connection and Number Printing
If the connection between the tablet and the printer is fine, the app will present the taking number button. Now, when a visitor touches this soft button (with the “Take a number” text), the printer should print a number. Test it and see that it works ok.
Note: the best practice for every morning is first to turn on the tablet and only after the Queue Printer app starts, then turn on the XPrinter, choose the USB option and wait till it is identified. Otherwise you might need to switch the XPrinter off and on. Subject to specific device and android version.
Once the printer is detected, click the purple “Connect” button to complete the connection. The app will now enter action mode, showing a “Take a number” soft button.
If the printer is not identified, an error such as “Printer Connect Failed” will appear. You may need to restart the printer.
Step 4: Adjust Printer Display Settings (Optional)
You can configure several visual and print settings in the app’s right pane:
-
Header/Footer Text (to be printed)
-
Font Sizes
-
Label Text Customization (e.g., change “Take a number”)
-
Upside-down Printing (depending on printer orientation)
Step 5: Test the Printer
Once connected and configured, test the printer:
-
Tap the “Take a number” soft button.
-
Confirm that a printed ticket with a number is generated.
Step 6: Daily Startup Best Practice
To ensure a smooth start each morning:
-
Power on the tablet.
-
Allow the Queue Printer app to fully start.
-
Then power on the printer.
-
Choose the USB connection method.
-
Wait for the printer to be detected.
This helps avoid identification errors. In some cases, a printer restart may still be required depending on the device model and Android version.