Sign up for a free evaluation account
Text Download ➞
Title Subtitle Download ➞

How to build a video wall?

What Is a Video Wall

A video wall is a setup of two or more TV displays arranged together to function as one larger visual unit. This can be:

  • A single large screen made from multiple displays

  • A split-screen layout where each display shows part of a larger image or video

  • A set of screens showing identical content simultaneously (like the ones often seen in electronics stores)

In short, a video wall creates a bigger, more engaging visual experience by combining multiple screens into one coordinated display.

When using NoviSign digital signage software on Windows, Android, or Chrome OS devices, you can build a video wall using one of three supported methods, which are described in the next section.

The switcher is also known as “matrix switcher” or “switch” or “splitter” or “controller” or “video wall processor”.

This is the most simple video wall implementation.

The video wall switcher is a device (bigger than a TV box) that can take input from one or more video feeds (usually by HDMI port).

The switcher will then split the video signal into multiple outputs (each one goes to a simple TV display).

Depending on the video wall switcher, you can set your output to different formats: Example: 2 x 2, 3 x 3, 4 x 4, 4 x 1, or else.

Some video wall switchers can show you 2 or 4 video inputs on each of your TV displays.

A good switcher we tried was of Kramer Electronics, which has branches at 35 countries in the world.

Also, another interesting solution is by a company called Userful, which has unique video wall combinations.

Of course, you can use other video wall hardware solutions, together with your NoviSign based mini PC / TV box / dongle.

Usually, a switcher is an expensive hardware, but does the job very well.

Video-wall-switcher

For this option (which is also known as “Daisy chain” or “chaining displays”), you need to purchase industrial and/or professional TV displays, which cost 2 or 3 times more than a simple TV display.

Professional digital signage displays have built-in features to allow you creating video walls.

This is done by connecting one screen to another through HDMI, DVI or DisplayPort.

This process is called daisy chaining, since the displays are like one chain: the 1st one is connected to the 2nd one, the 2nd one is connected to the 3rd one, the 3rd one is connected to the 4th one and so on.

You can have 2 or more TVs like that in this constellation.

Your NoviSign based mini PC / TV box / dongle will be connected to the 1st display. Each display TV should be configured according to its position on the video wall.

Here is a tutorial video of how to create a videowall using LG professional TV display.

Here is a nice example of 4×1 videowall by Primeview, using NoviSign’s APK.

A cool example of daisy-chaining 12 Primeview 10.1″ professional displays into a 12 x 1 and 3 x 4 video walls is in this video.

For a how-to video (both on the hardware side and on the Studio CMS content side) here is a tutorial video and a technical post about how to build the videowall content accordingly.

Chaining-professional-TV-displays

This option is unique to NoviSign.

The synchronization feature allows you to synchronize the clock of multiple separate units (which can be an assortment of Android, Windows or ChromeOS players).

Each unit is connected to a simple TV display.

One of the synced units will act as an NTP server that sends time pluses every minute to all the other units.

The main advantage of this option is that you can put a different playlist in each synced unit, in order to display something which is made of different content (like a sentence, in which each word appears on a different screen).

Another important advantage of this option is the resolution: while in the 2 above options, you are limited to the maximum screen resolution supported by the TV box which is connected to the video wall (which is probably not more than 4K, which is 3840 x 2160; on a 2 x 2 video wall each TV will have a resolution of a portion of the original content, i.e. 1920 x 1080 and on a 4 x 4 video wall each TV will have a resolution of 960 x 540 pixels, which might look pixelated or blur on big TVs).

In this option you are not limited like that: each TV box is independent, that means you can have a video of 7680 x 1080 pixel (which cannot be played by any TV box, due to its high resolution), then cut it (using a cropping software tool like Movavi) into 4 different 1920 x 1080 videos (which any TV box which supports full HD resolution can display), which will be used in 4 different creatives / playlists to be displayed synchronized, each one on each of the 4 different TV boxes.

There are 2 disadvantages to this options:

  •  if the network stops working or no communication to the NTP server, the units may get out of synchronization after a while;
  •  you can use only single slide playlist, which has a slideshow widget with multiple slides (videos, images, text) within. Playlist with more than one slide won’t work.

To use this option, please refer to this user guide.

Here is a nice YouTube video demonstrating the sync feature in action, with 3 shelf edge displays, showing a bottle moving from left to right through the separate screens.

Synchronized-separate-units

Other options can be using a Chromebox that plays NoviSign app and shows the same content on 2 different displays (by connecting the 1st display TV to the HDMI port of the Chromebox and connecting the 2nd display TV to the DisplayPort of the Chromebox).

This can be done also in Windows miniPC with more than one HDMI port.

You can also use an extended digital display (only when using a Windows TV box of 8GB RAM, strong processor and more than one HDMI port) to run the NoviSign app in more than once instance on the same player, when each app instance is broadcasted to a different display (see this post, under the title “How to run the native Windows app in extended displays?”).

Please notice that using videos in this case will look good on not more than 2 displays.

How to create a unique video wall?

Video walls are one of the most impressive and engaging features in the digital signage world. When designed creatively, they can deliver a powerful visual impact in any environment.

This guide focuses on building unique video wall configurations using NoviSign, with an emphasis on content setup rather than hardware. The examples provided use 10″ Primeview professional displays, but the same principles apply to any display supporting daisy chaining or video wall processing.

Connecting the displays is the simpler part of the process. For example, in a daisy chain configuration:

  • Connect the Android media player (e.g., Minix X10 mini) to the HDMI-IN of the first screen.
  • Use an HDMI cable to connect the HDMI-OUT of the first screen to the HDMI-IN of the second screen.
  • Repeat for the remaining screens.

Once the screens are connected and positioned, you’re ready to configure your video content.

Daisy-chained-professional-displays

Below are layout examples for various video wall configurations, along with best practices for content setup:
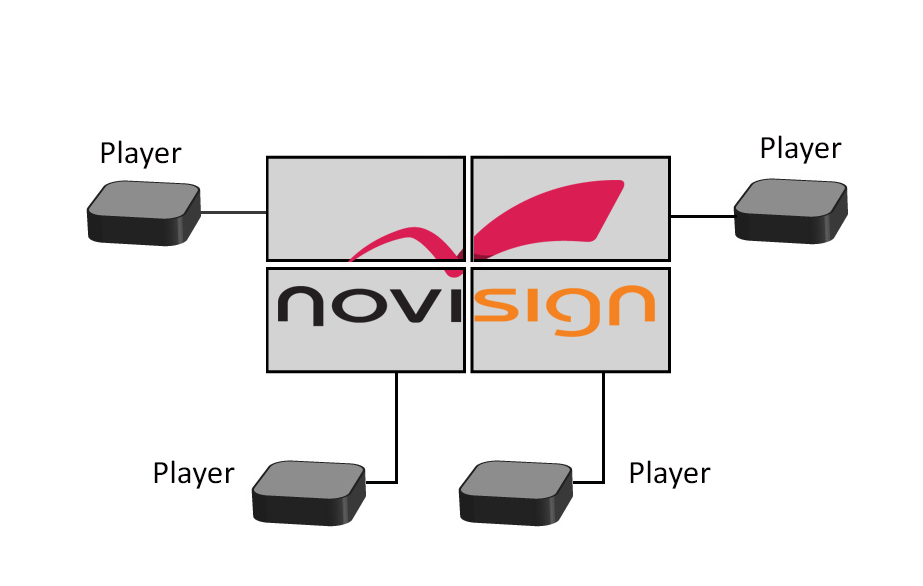
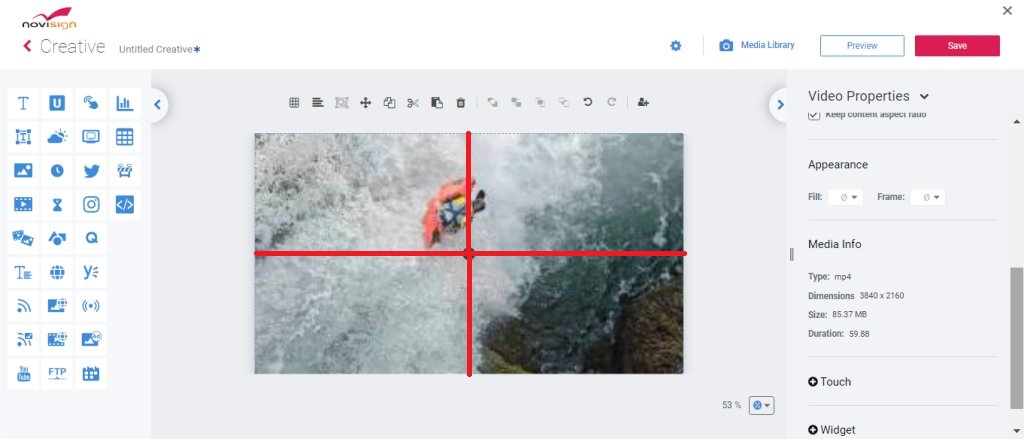
 2 x 2 Video Wall

This means you have 4 displays, aligned in 2 rows and 2 columns.

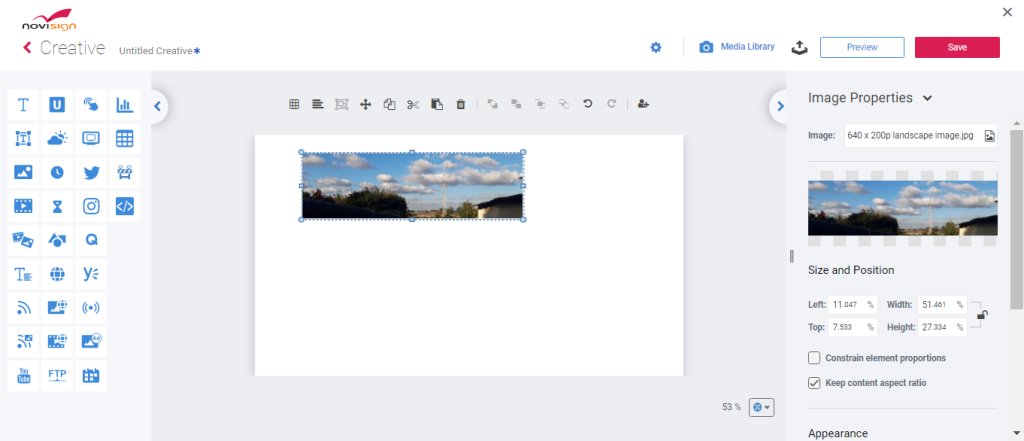
In this case, if your Android media player is 4K (3840 x 2160p) and the content video that you put in the composed creative is also 4K resolution, then, since the content will be divided into 4 equal squares, each square (or actually, display) will get 1/4 of this resolution, which means, each of your 4 displays will get 1920 x 1080p (full HD), which looks nice.

This way (like in mathematics, the X axis is horizontal and goes from left to right, while the Y axis is vertical and goes from top to bottom), the top left “virtual” square has x1y1 coordinates, the top right “virtual” square has x2y1 coordinates, the bottom left “virtual” square has x1y2 coordinates and the bottom right “virtual” square has x2y2 coordinates.

See the example below:
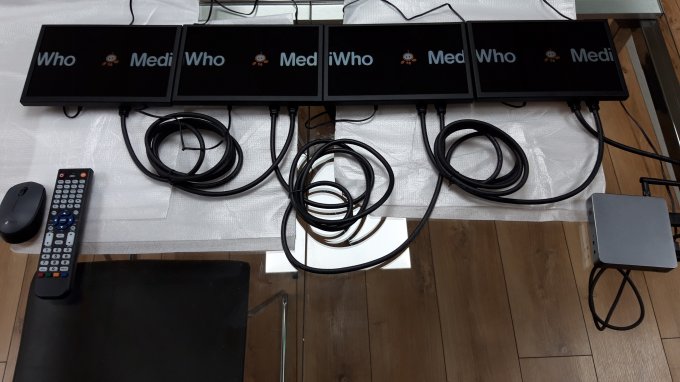
Videowall-2x2

4 x 1 Video Wall

This means you have 4 displays (each is 16:9 ratio, of course), aligned in 1 row (and 4 columns). In this case, if your Android media player is 4K (3840 x 2160p), the video content should be in 2 possible ways:

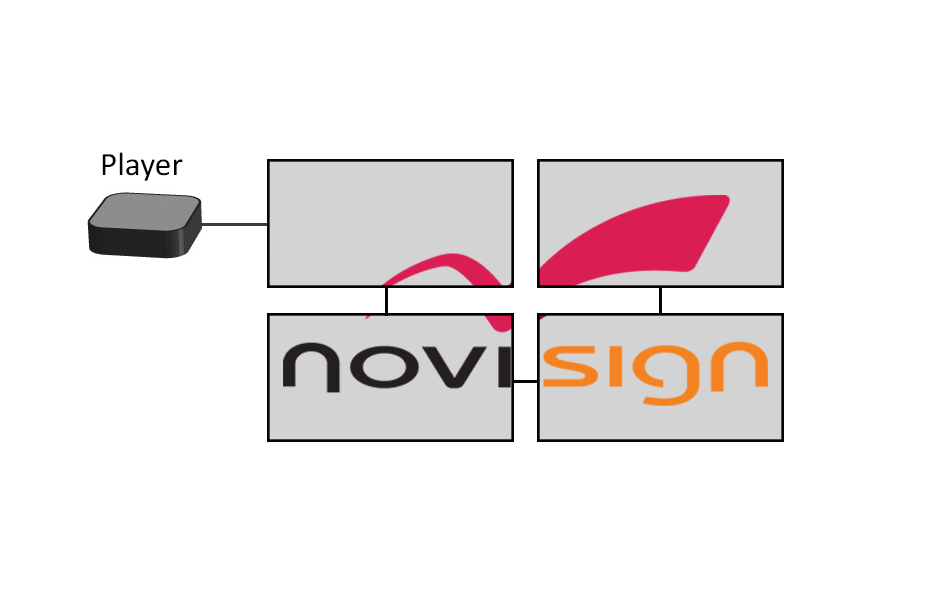
  •  A video of 3840 x 540p (to keep ratio of 64:9), which should be placed in the top 1/4 strip of the canvas in your creative composer, and the content video that you put in the composed creative, like this:

Videowall-4x1

This way the top left “virtual” square has x1y1 coordinates, the next “virtual” square is x2y1 coordinates, the third one has x3y1 coordinates and the fourth one has x4y1 coordinates, as they’re all on the first line (X axis).

Since the top trip will be divided into 4 display, each display will get 960 x 540p screen resolution which is fine (but can be better).

This can also be done with a 3840 x 2160 video, which 3/4 of its bottom is just black, while the video itself is in the top 1/4, like this:

Videowall-4x1

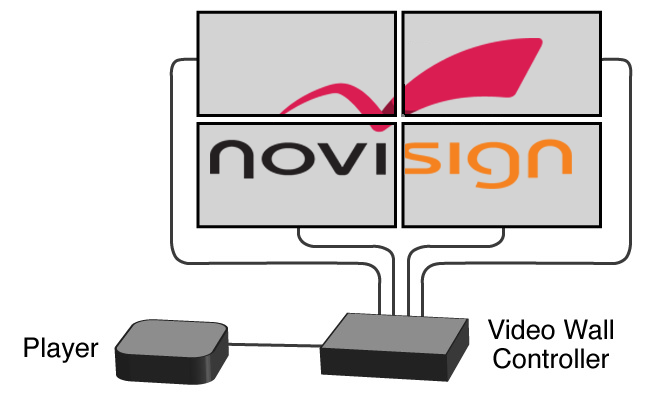
  •  A video of 3840 x 2160p, which its top half is consisted of the content to be displayed on the 2 left displays, while its bottom half consists the content of the 2 right displays:

Videowall-4x1

Using this method for your 4 displays, you’ll get the sharpest view.

You’ll have to ask your graphics designer to create this video in 3840 x 2160p, where its top half is the left half of the original video, while its bottom half is the right half of the original video.

In this case, the resolution for each display will be 1920 x 1080p (which is 1/4 of the whole resolution), which is better than the previous example.

But that require a graphical change in the original video that was used in the creative.

Here is how it looks if you put a moving object.

On the special video it will look as it’s moving from left to right on the top row (which will be displayed on the 2 left displays on your 4 x 1 video wall) and then starts from the left toward the right on the bottom row (which will be displayed on the 2 right displays on your 4 x 1 video wall).

Once you set the 4 displays in one row, it will look as it is moving from the left-most display all the way to the right-most display:

Video-wall-2x2

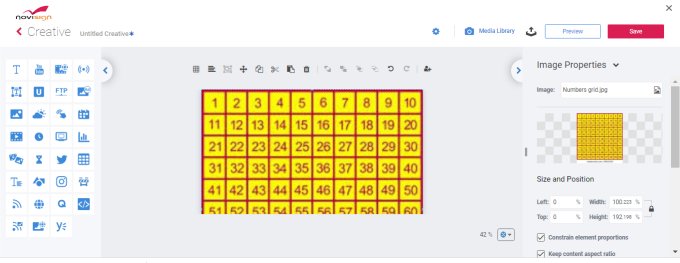
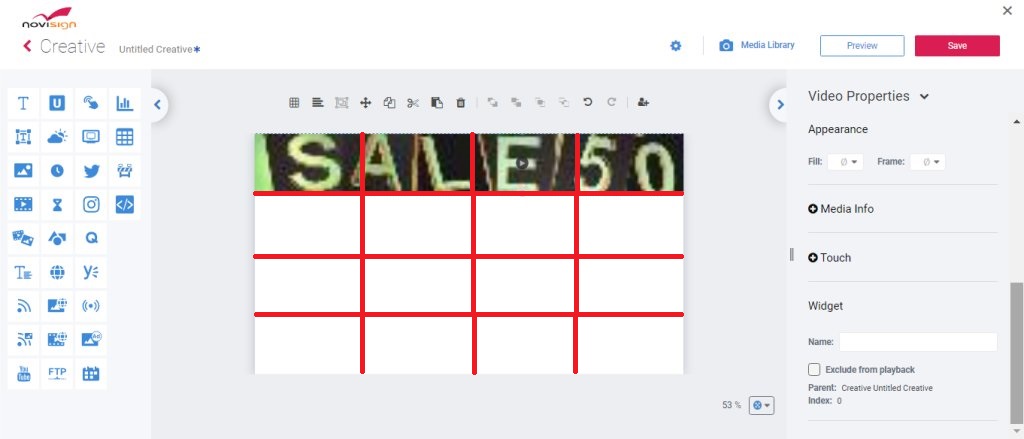
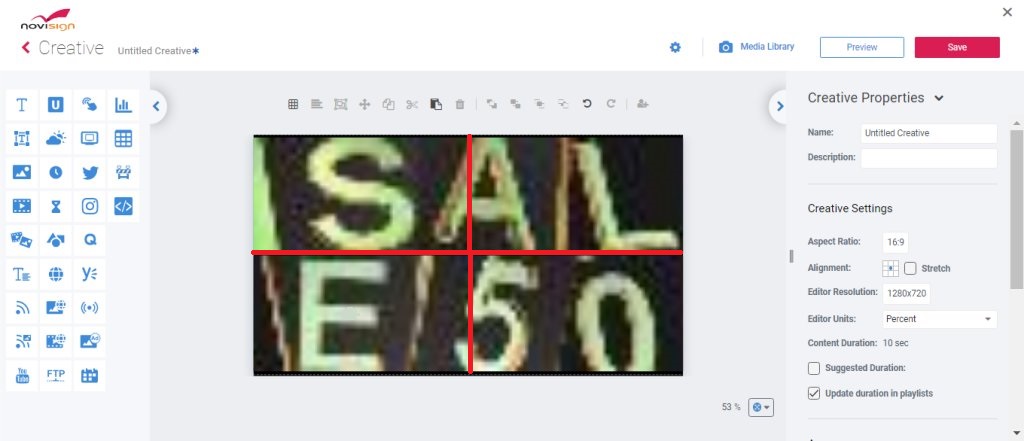
3 x 3 or 9 x 1 video wall

This means you have 9 displays (each is 16:9 ratio, of course), aligned in 3 rows and 3 columns (like a tic-tac-toe board game). In this case, if your Android media player is 4K (3840 x 2160p), the resolution of the video content each of the 9 displays will be 1280 x 720 (HD) which is 1/9 of the whole resolution.

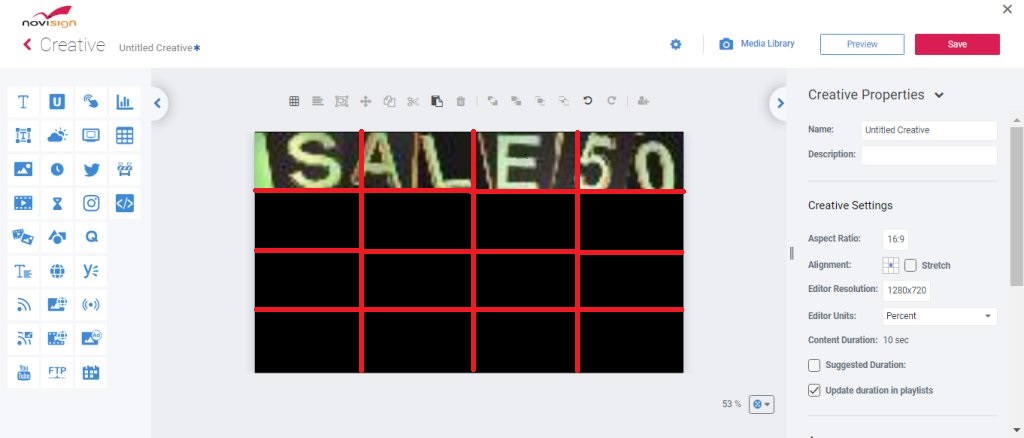
You can also align those 9 displays in a 9 x 1 video wall (that means one horizontal row of 9 displays). In the following example, you can see how we made one video that will look good both on 3 x 3 and on 9 x 1, where the object keeps moving between the displays.

Just imagine that if you had to make one video of long strip (which would have been 3840 x 251p, to keep aspect ratio of 16×9 : 9), in that case each display could have got only 426.6 x 251p screen resolution which would be very blur.

Hence, putting up a video in a 3 x 3 grid-like position would end with a much better result of 1280 x 720 (HD) for each of the 9 displays:

6 x 1 video wall

This means you have 6 displays (each is 16:9 ratio, of course), aligned in 1 row (and 6 columns).

In this case, if your Android media player is 4K (3840 x 2160p), the best way will be to have a 3840 x 2160p video content (which will look as a grid-like of 3 x 2 (this way, each display will get a higher resolution).

The wrong way to have it will be a 16×6 : 9 (which is 96 : 6 aspect ratio, which will end in a 3840 x 360p), because in this way, each display will show 1/6 of this long horizontal strip and will finally get a low 640 x 360p very low screen resolution:

Video-wall-1x6Creative-with-640x200p-content

Some displays, such as custom LED displays, may have a non-standard screen resolution, sometimes even very low resolution.
This is relevant not only for video walls, but also when displaying content only in a single TV display.
Imagine you have a LED display of 640 x 200p. Something like this:

LED-display-640x200p

This is definitely not 16:9 and none of the Android media player supports this resolution.

So, if you build a creative to be displayed in this 640 x 200p LED display, then a composed creative which is set to custom dimensions of 640 x 200 pixels or to custom dimensions of 16:5 aspect ratio – this will not work good on the Android box, because the Android box doesn’t know how to process it well (since it doesn’t support this unorthodox screen resolution).

The right approach here will be to build a 16:9 standard creative and then place the content somewhere within the creative.

Where is that somewhere? It is a matter of trial and error. It may look like this:

Creative-with-640x200p-content

That means, you will need to do some trial-and-error in order to find out where is correct rubric, on the canvas, that will appear on the physical screen (and that is very individual to the custom screen resolution of your special TV display, combined with the supported screen resolutions of your Android box).

To shorten this process, you can put an image on the whole canvas and see which part of it is chopped off and which part will be taken into this 640 x 200p display borders.

An image with a grid and numbers, like in the following example, will do the trick and will allow you, in a better way, to figure out which part of the canvas is actually displayed on the physical LED screen:

Creative-Composer-with-numbers-gridWe like to keep it simple.