This technical post will explain you how to integrate NoviSign’s APK (our Android player app) with any web API.
Why would anyone like to integrate a web service with our Android APK? Well, in order to get external data that can be used in your creatives.
How do I do it?
In two levels:
First – you need to define the APK settings according the web API.
Second – you need to use data expressions in the creative you’d like to use data from that web service. That should be done in a similar manner the way we use data expression (i.e. like integrating a user with a Google spreadsheet).
The APK settings
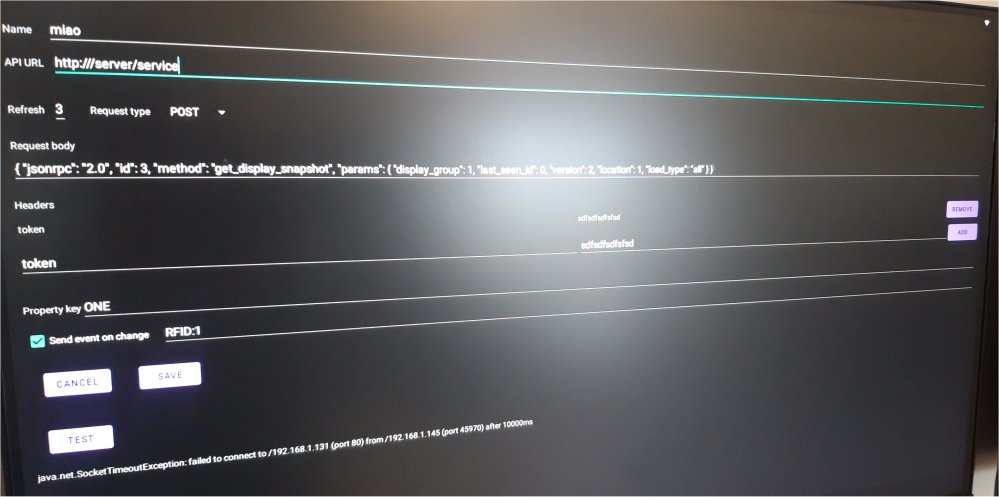
You can find all the API integration settings under the “External Interfaces” (which is in the “Advanced” block of settings).
There is a submenu called “API Integration Settings”. Within you will find the next settings:
- Name – This is the name of the API (you can give it any name).
- API URL – This is the URL of the API to be used.
- Refresh – This is the interval (in seconds) of communicating with this API.
- Request Type – Either GET or POST.
- Request Body – This can be a JSON format of the body to be received by the API (in case this API is expecting to receive a body part).
- Headers – Here you can add as many headers that are expected to be received from the API (in case this API is expecting to receive any header).
- Property Key – The variable which the response body of the API request will be saved into. And it will be used on the Studio CMS for presenting the response body with the dynamic data expression in the following format: ${@customapi.[property_key].[JSON_path]}
Example: ${@customapi.SHELF.Item0.Price} - Send Event on Change – The event written here (for example, “RFID:1”) is the event that will be triggered in case the JSON response (any of its values) has been changed when the received input from the API. Notice that you can also test the API by pressing the “TEST” button below.
The creative content
In order to use the data you extract from the web API defined in the example above, let’s take a scenario where you get 2 items where each one has 3 properties of item name, item price and item barcode ID.
To display the first item’s (item 0) barcode, use this data expression in any textual widget: ${@customapi.SHELF.Item0.BarcodeID}
To display the first item’s (item 0) name: ${@customapi.SHELF.Item0.Name}
To display the first item’s (item 0) price: ${@customapi.SHELF.Item0.Price}
To display the second item’s (item 1) barcode, use this data expression in any textual widget: ${@customapi.SHELF.Item1.BarcodeID}
To display the second item’s (item 1) name: ${@customapi.SHELF.Item1.Name}
To display the second item’s (item 1) price: ${@customapi.SHELF.Item1.Price}
That’s all folks,
The Dude.
About The Author: Nir
More posts by nir