Sharing Creatives and Playlists with Other Accounts
Sharing Creatives and Playlists with Other Accounts
Sharing a Creative
You can share an entire creative or specific widgets within a creative with another account. Once shared, the creative (or widget) will appear in the other account.
If you share only a widget, the recipient account will see the full creative, but only the shared widget will be editable—based on the permissions you set.
If you share the entire creative, the other account will be able to view and use the full content according to the access level you allow.
Users in the recipient account can duplicate a shared creative, making an independent copy that they can fully edit and use as their own.
Note: In NoviSign, a user may have access to multiple accounts. For more clarity on how users and accounts work, we recommend reading our tech blog post on accounts.
How to Share a Widget or Creative
To share a creative or a specific widget with another account, you’ll use the Sharing feature inside the Creative Composer. This allows you to control who can view or edit your content across different accounts.
Open the Creative in edit mode (Creative Composer).
To share a widget:
Click on the widget you want to share.
To share the entire creative:
Click outside the canvas (any empty space), so the creative itself is selected.
Click the Sharing icon (the rightmost icon above the canvas that looks like an “L” with an arrow).
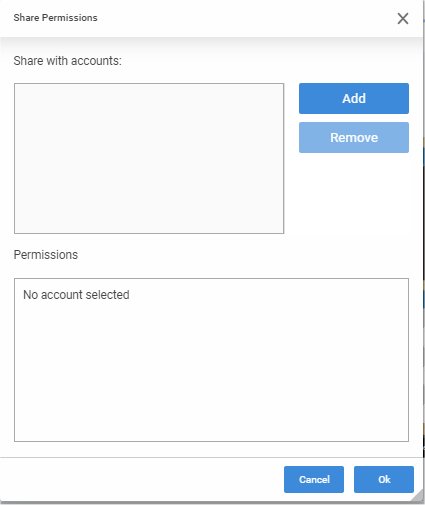
In the pop-up window, click “Add” to start the sharing process.
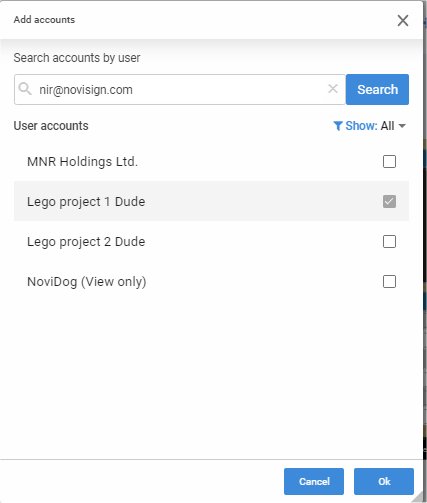
Type the target username in the search box and click Search (you must type the username—there’s no dropdown list).
Select the user, then choose one or more of their associated accounts.
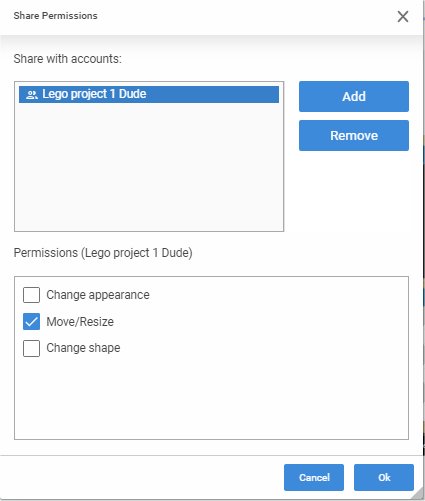
For each account, set the permissions (view, edit, etc.) as needed.
Click OK to finish and don’t forget to save the creative.
The creative (or shared widget) will now be visible in the selected accounts with the permissions you set.
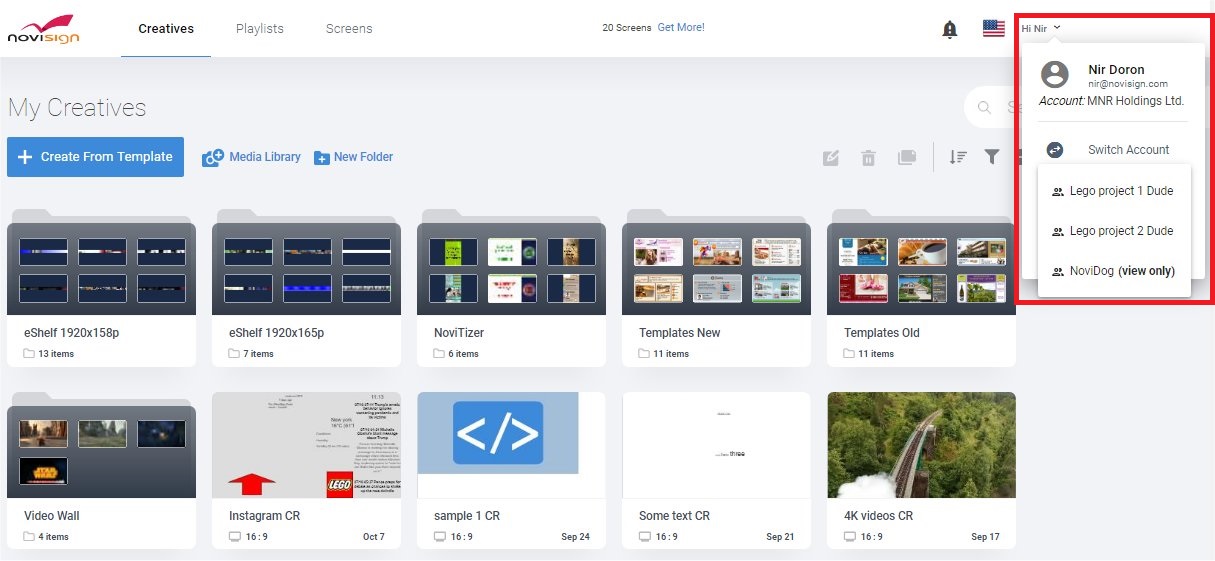
Tip: You can switch between your available accounts using the “Switch Account” option in the top-right menu of the Studio.
Sharing a Playlist
You can also share a playlist with another account. Shared playlists appear in the other account as view-only by default.
The recipient can:
Use the shared playlist on their screens.
Duplicate the playlist to create an editable version that is no longer linked to the original.
How to Share a Playlist
Open the playlist in edit mode.
Click the Sharing icon in the top-right corner (looks like a person surrounded by four smaller heads).
In the pop-up window, click “Add”.
Type the recipient’s username and press Search.
Select the user, then choose one or more of their accounts.
Click OK twice.
Don’t forget to click “Update” to save the changes.
The playlist will now appear in the selected account(s) for use or duplication.
Share-Only User Feature
The “Share Only” feature is typically available to partners who use the Admin tool and can assign users as “share only” users. This role is designed for situations where a user should only be able to edit content that has been shared with them—nothing more.
If your NoviSign account is set to “Share Only,” you won’t see any of your previously available playlists or screens. Instead, you might encounter an error like “Playlists load has failed.”
To avoid this, make sure to share the necessary playlists with the user before enabling the “Share Only” setting. Once activated, the user will only be able to access the content that was shared with them in advance, so pre-sharing ensures smooth functionality.
Important: If you plan to use “Share Only” mode for a user, make sure to share all necessary creatives and playlists in advance. Once the mode is active, sharing must already be in place for the user to function properly.
Watch a Tutorial video
Checkout out this step-by-step training guide on how to share your Creative or Playlist with other accounts: