These are release notes of Android player app and Chrome OS player app v4.4.141 (release of Chrome app v4.4.141 will be delayed); two major features were added to this version:
- Support in the new built-in thermometer which is a new option to be added to the NoviTizer (NoviSign hand sanitizer kiosk). Please notice that the thermometer is available only in some of the NoviTizer models.
- Allowing one device (Android or Chrome OS) to trigger (by touch press) an event on another device.
How to configure the APK for using the thermometer?
So, you got the new model of the NoviTizer with the built-in thermometer. Now you have to configure the NoviSign player app to be using the thermometer.
On the online Studio side:
- Make sure that the 2 thermometer events are assigned to the Studio user which you are going to create the content by (you cannot contact our support to confirm that).
- In your Studio user account, create some content (one or more creatives) to be played in a playlist. Also create one creative to show when a sick person is using the thermometer and one creative to show when a healthy person is trying the thermometer. In you playlist, while in edit mode, add the “Thermometer OK TEMP” thermometer event to the creative which is meant to be displayed for a healthy person and the “Thermometer HIGH TEMP” thermometer event to the creative which is meant to be displayed for a person with high fever.
- In each of those two creatives, if you like to show the temperature, put this data expression: ${ID.value} in a label widget. That will show the reading number. So if you put there text such as: Your temperature is ${ID.value} Celsius degrees, then on the display ${ID.value} will be resolved to the actual temperature reading from the thermometer.
On the NoviTizer side:
- You need to configure the player app in the following manner:
Probably, the NoviTizer, already came pre-installed with the NoviSign APK.
Whether it was or wasn’t, make sure you have the latest version of the NoviSign APK.
To download and install the latest NoviSign APK, go to our download website and download the top-most APK there: https://app.novisign.com/downloads/ - On the entrance screen of the NoviSign’s app set your screen key.
- Click the gear icon in the top-right corner of the entrance screen in order to enter the app’s settings.
- Change the setting “Parameters Name” (under “Player” block of settings) to “ID” (without the quotes).
- Change the setting “Parameters Key” (under “Player” block of settings) to “0” (zero, without the quotes).
- Change the setting “Display Notifications” (under “Display” block of settings) to off.
- Change the setting “Skip Incomplete Slides” (under “Play Mode” block of settings) to off.
- Change the setting “Skip Slideshow Incomplete Slides” (under “Play Mode” block of settings) to off.
- Change the setting “RF ID Reader” (under “Advanced” block of settings -> “External Interfaces”) to on, to allow keyboard events to the unit.
- Enter the “External Interfaces” menu under the “Advanced” block of settings and change the setting “Enable Thermometer Events” to on.
- Change the setting “Fever Threshold”. You can change to any number (i.e. 37.8) – equal to or above it, it will be considered as fever. This can be either Celsius or Fahrenheit degrees, but you must have it suitable to the thermometer settings (your thermometer can be toggled to work either with Celsius or with Fahrenheit scale).
- Change the setting “Reading Threshold”. You can change to any number (i.e. 35) – below it, any reading from the thermometer will be ignored (as this thermometer takes a reading every 5 seconds no matter what, and we would like to filter out that “noise”. This can be either Celsius or Fahrenheit degrees.
- Exit the settings and press “Go”.
- Try the thermometer and see that all works as expected.
How to configure your Android devices, to fire events between them?
You can set one Android device to trigger (by touch) an event which will take part on a another Android device. Example: say that you have an Android tablet and an Android TV mounted on the wall. You can set a touch area on the playlist you run on the tablet, so when someone touches that soft “button” on your small tablet, something will happen on the big Android TV. Such as a catalog of cars with thumbnails on the tablet: once the customer touches any of the buttons/thumbnails on that tablet, a commercial/information video will appear on the big Android TV. Of course, a video which explains about that particular car which the customer has just touched. One thing to remember: those 2 units MUST be on the same network, otherwise it won’t work. So, here is how to do that:
On the app’s side:
- On the sending unit (in the above example: the Android tablet), there is nothing to configure. All configuration is actually done in the content which you’re going to play on this unit. The settings to handle are on the receiving unit (in the above example: the Android TV). So, first thing first: install the NoviSign APK on it.
- From the entrance screen of the NoviSign app access the settings, by clicking the gear icon in the top right corner of the screen.
- Scroll down to the bottom of the settings till you reach the “Advanced” block of settings, where you can find the setting “External Interfaces”. Below there is a setting called “RF ID Reader” – turn this setting on. This will allow this unit to keyboard events.
- Scroll down to the bottom of the settings till you reach the “Web Server” block of settings, where you can find the setting “Connection Parameters”. Turn on this setting. This will allow this unit to receive HTTP events (in this case, from a different unit on the same network).
- Take a look at the “Device IP Address” (look at the local IP address, which is the first of 2 IP addresses, in case you see 2 IP addresses there) and at the “Current Port” settings and write those values on a piece of paper.
- Exit the settings and exit the NoviSign APK.
- Go the the Android settings of the unit and enter the network settings.
- You need to set a static IP address there, which should be the same IP address which was already assigned to this unit. So set it to the IP address which you have written on that piece of paper.
- Exit the Android settings and enter the NoviSign app.
- In the entrance screen of the NoviSign app, check the “Start automatically…” checkbox, so the app will automatically start playing the content after any reboot or power failure.
- Login to your Studio account using the login controls in the top right corner of the entrance screen.
- After logging in, you’ll be able to click the magnifying glass icon and choose your screen (rather than typing it in the screen key input box).
- Press “Go” and the app will download the content and then will start playing it.
- After one cycle of playing, if all looks good, right click to stop the running content.
- From the entrance screen of the NoviSign app access the settings, by clicking the gear icon in the top right corner of the screen.
- Turn off the “Display Notifications” setting (under the “Display” block of settings), in order not to display possible notifications in a live screen.
- Exit the settings back to the app’s entrance screen.
- Press “Go” and the app will start playing the content. Please notice that at this stage you still have no valid content for any of the 2 units. That content will be changed in the next block of instructions.
On the online Studio side for the receiving unit:
- Create some content to be played on the receiving unit. That content should be one playlist which has at least one (or more) creative to run most of the time.
- Also, add a creative to be triggered only when a certain event happens. Once you added this creative (please notice that you can add as many creatives as you like where each one of them will be triggered by a different event), you need to assign an event to it.
- To assign an event to the creative which is supposed to be triggered by an event and appear only when triggered by that event, while you’re in edit mode of that playlist, click the schedule icon (looks like a datetime picker icon) of the creative on the canvas.
- Instead of scheduling the creative, check the “Events” checkbox.
- In the events list, find the event you wish to assign to this creative and check its checkbox. If that event doesn’t appear in that list, please contact our support team and ask us to assign that event to this username of yours.
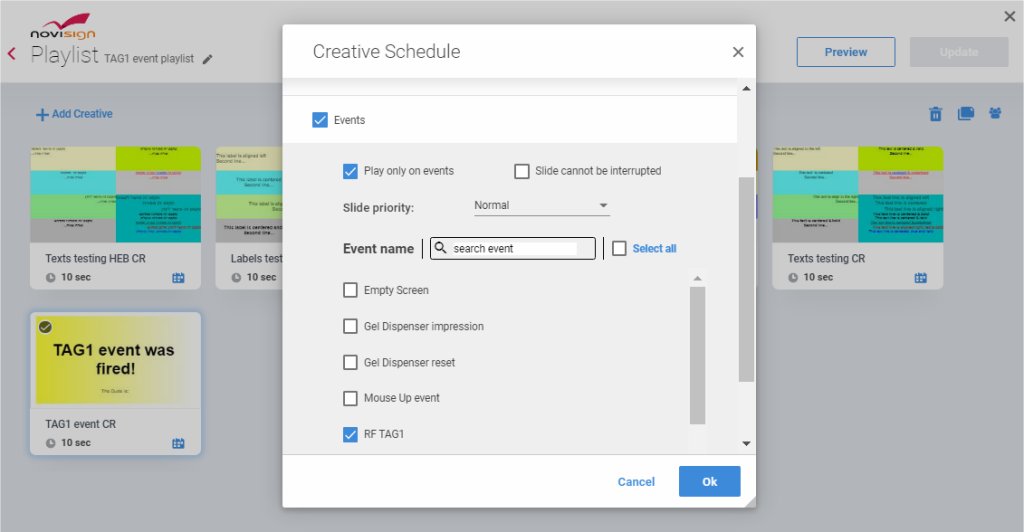
- Also check the “Play only on events” checkbox, in order to make sure this creative will be displayed only when it is triggered by the chosen event and not as part of the running playlist.
- Press “Ok” and then press “Update” to save your playlist.
- In the “Screens” tab, assign the playlist to the screen which you have set on the receiving unit. After 2 minutes, the content should be updated on the screen of the receiving unit (the Android TV in our previous example).
On the online Studio side for the sending unit:
- Create some content to be played on the receiving unit. That content must have a dominant creative where a button-like element should appear. That button pressing should be the trigger for firing the event from the sending unit over the receiving unit.
- On that creative, add the element you want to be the button-like (can be video, image, text or label widget) to creative.
- Now you need to set the touch functionality of that widget which you have dragged to the canvas. Click the “button” widget and its properties would appear in the right pane of the Creative Composer.
- On the properties pane of the widget, click the touch section to expand it and then click the dropdown list of the touch properties.
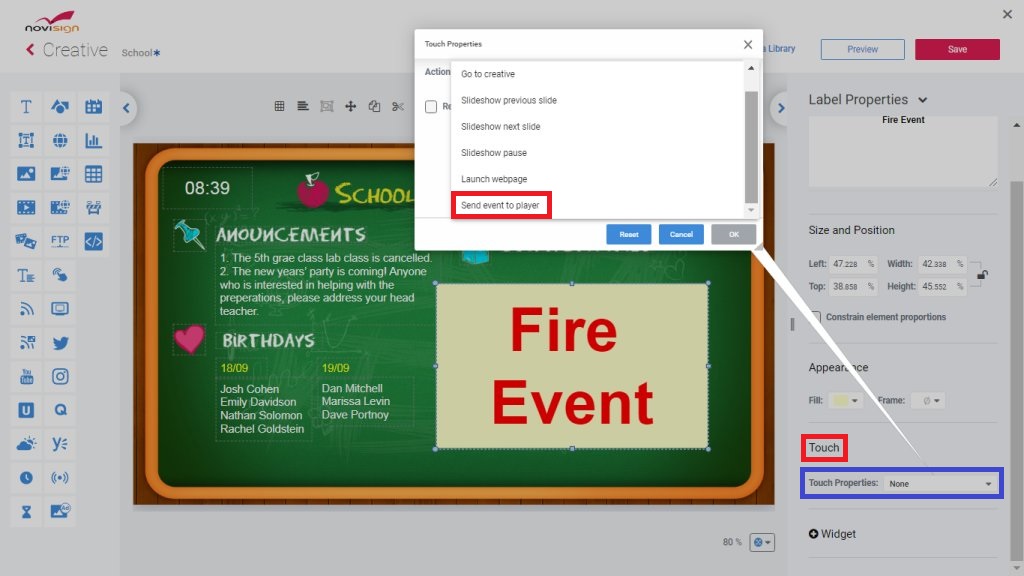
- A popup window will appear. in the “Action” dropdown list choose the option “Send event to player”. This is the option to send an event to another unit by touching this widget.
- After choosing it, new option will appear below. In the “Player IP” textbox, fill the local IP address of the receiving unit (you have it on that piece of paper).
- In the “Player Port” textbox, fill the port of the receiving unit (you have it on that piece of paper).
- In the event dropdown list choose the same event you have set to trigger the target creative in the receiving unit. Since you’re in the same username which you created the previous content for the sending unit, you should have that event listed here as well. If this is a different user account, then you’ll need to contact our support team and ask us to assign that event to this username of yours.
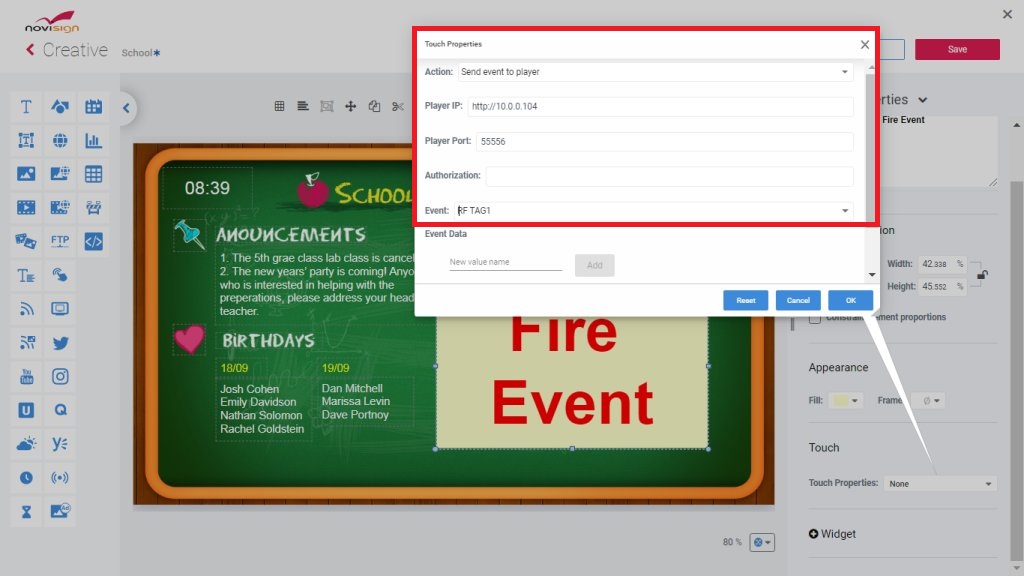
- Please notice that you can have as many “buttons” in your creative, where each one can trigger a different event on the receiving unit, which as a consequence, will display a different creative for each event/”button”.
- Now, add that creative to a playlist and assign that playlist to the screen which you have set on the sending unit. After 2 minutes, the content should be updated on the screen of the sending unit (the Android tablet in our previous example).
- That’s all. On the sending unit touch the “button” that should fire the event on the receiving unit and the receiving unit should display the target creative as a consequence of that. Hurray!
We’re ready to land on the moon, folks!
Nir, the Dude
 info@novisign.com
 +972 (9) 794-7643
 (646) 893-7770

