This guide explains how to prepare, install, and pair an Android device for use as digital signage players.
Android signage can run on many types of hardware, including:
Media players (TV boxes, set-top boxes, Mini PCs, dongles)
Tablets
Smart TVs (SoC / digital signage displays)
Touch kiosks
Because Android digital signage can run on a wide range of hardware, we’ve compiled an optimized configuration that works well for most environments. Key settings such as date and time, notifications, and system updates are essential to ensure smooth and reliable performance.
Configuring the Android settings
On your Android unit, connect a mouse (just for the installation procedure).
Set the Wi-Fi network or LAN network connectivity.
Under “Date & Time” set the timezone to your time zone.
Turn on the the automatic date & time and the automatic time zone.
If you have under the “Display” a sleep option, better set it to “Never”, as your device should be playing 24/7.
Under “Security” check the “Unknown sources” checkbox in case you’d like to download our APK from our downloads website (this way you’ll be able to automatically upgrade the app, if your Android firmware is rooted) rather than from Google Play store.
In case you would like to display your digital signage in portrait mode, you need that your signage player will support screen rotation. These days most of the Android based media players support this functionality, but few do not. The rotation option (assuming that your Android player has it) should appear under the “Display” menu, probably under a submenu called “Screen Rotation”, “Screen Direction” or “Screen Orientation”. There might be one or two ways for the roation (90 degrees or 270 degrees, which is upside down rotation).
Optional: Under the “Accounts”, set a Gmail account (new or existing) to be used in the Google Play store later, in case you’d like to download the app from the Google Play market.
Installing the NoviSign Digital Signage App
Option 1: Install via Google Play Store
Note: This method does not support automatic updates.
Open the Google Play Store on your Android device (assuming you have it there, otherwise this installation way is irrelevant and you should move to the next suggested installation way).
The app will be downloaded and installed within minutes.
Option 2: Install via NoviSign Downloads Website
This is another way of a few ways to install NoviSign’s APK on your Android device. The advantage in this way, in case you have a rooted firmware on your Android device, is that you’ll be able to use theauto-upgrade feature of the app.
Open a browser on the Android device (you can open the default Android browser or Chrome browser if you have it installed or if it came pre-installed).
Click (means left-click) the APK file which appears in the top of the file list (it will look like this:novisign-rel-<the app’s version>.apk).
The file will start to be downloaded to that device. It might ask you a question of how to download it (i.e. usingES3 file management appor else).
You might have a link there (in the installation feedback popup window) for installing the app. Click it for start installing. If you already have an older version of the app which was installed as an APK (and not from Google Play), then it will be overridden by the new version (upgraded).
If the APK did not start the installation process, go to the “Downloads” app you may have among the pre-installed apps in the Android unit. There you’ll find the APK file. Just click it and press “Install” and “Next” in order to complete the installation.
In case the “Downloads” app cannot open the APK (rare, but may happen in some firmwares, that you get some kind of error), you need to open it in another way: open the “Explorer” app or another file management app. Search for the “Download” root folder on the Android device’ storage. Then enter that Download folder (which holds all the files which you downloaded to the unit before), find the APK and click it. From here it should be able to install.
After finishing the installation, you’ll be notified and might have an “Open” link to open the app (if not, you can open the NoviSign app from the “Apps” section in your Android unit).
Pairing the Player Using Quick Link
NOTE: At the moment, Quick Link is available only on the Android player app (APK).
Quick Link is a faster and easier way to pair a physical media player or smart display with a screen in your NoviSign Studio CMS account.
In the past, pairing required manually typing a long Screen Key or logging into the player app directly on the device and selecting a screen. Quick Link simplifies this process by allowing you to pair the device using:
A QR code, or
A temporary 6-digit code
This removes the need to type credentials or long screen keys on the signage device.
Previously, after creating content and screens in your Studio account, you had to connect the physical device to the correct screen by:
Typing a Screen Key Each screen has a unique key that had to be entered manually on the device.
OR
Logging in on the device You would log into your Studio account directly from the player app, then use the magnifying glass icon to select a screen from a list.
While still supported, these methods take longer and are less convenient—especially when deploying many devices.
When the NoviSign Android player app starts for the first time (or when not yet paired), it automatically displays a Quick Link pairing screen.
This screen includes:
A QR code
A 6-digit temporary pairing code
A pairing website URL
You complete the pairing from another device (such as your smartphone or laptop), not directly on the signage player.
The 6-digit code is temporary and refreshes regularly for security.
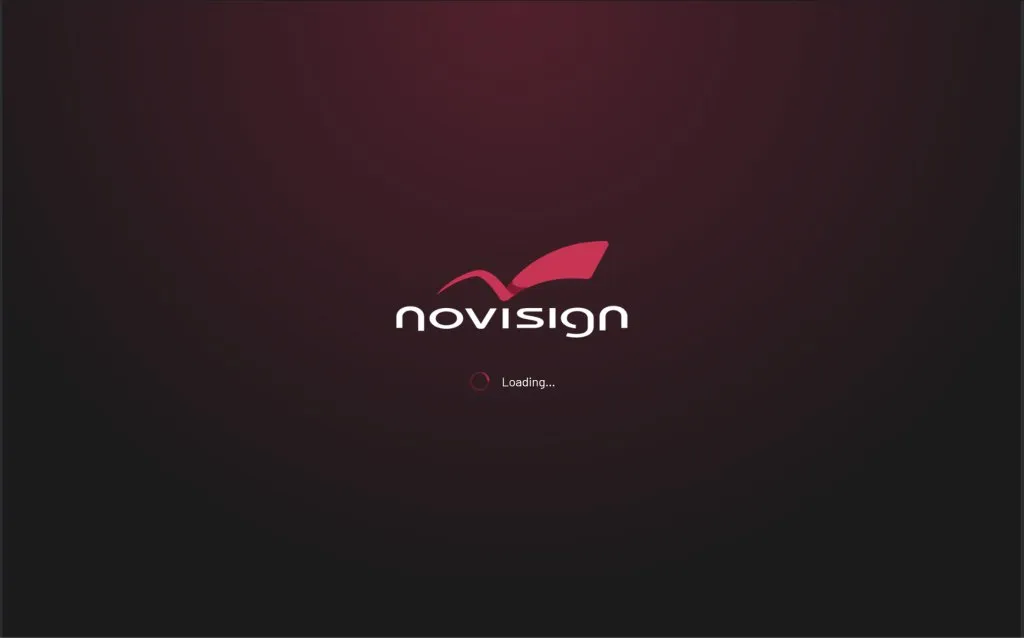
Right after launching the app, you will first see a loading screen.
A moment later, the Quick Link pairing screen appears, showing:
A large QR code
A 6-digit code
A web address for manual pairing
While you complete the pairing on your phone or computer, the player will display a following screen until the process is finished.
Follow these steps:
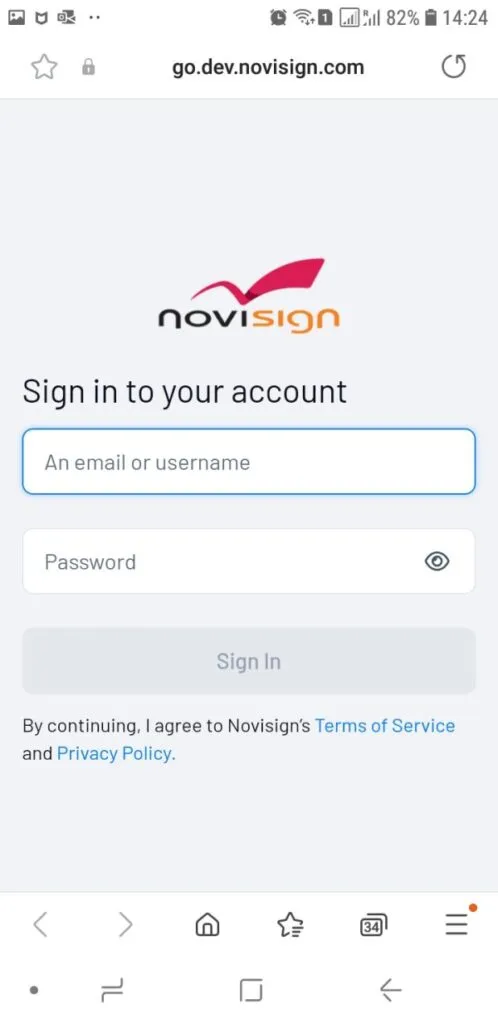
Open the NoviSign app on the Android device The Quick Link screen will appear automatically.
On your smartphone or laptop, choose one of the following:
Option A – Scan the QR Code (Recommended)
Open your phone’s camera
Scan the QR code shown on the screen
The pairing webpage will open automatically
Option B – Use the 6-Digit Code
Open a browser
Go to the URL displayed on the player screen
Enter the 6-digit pairing code
Log in to your Studio account on the pairing webpage using your username and password.
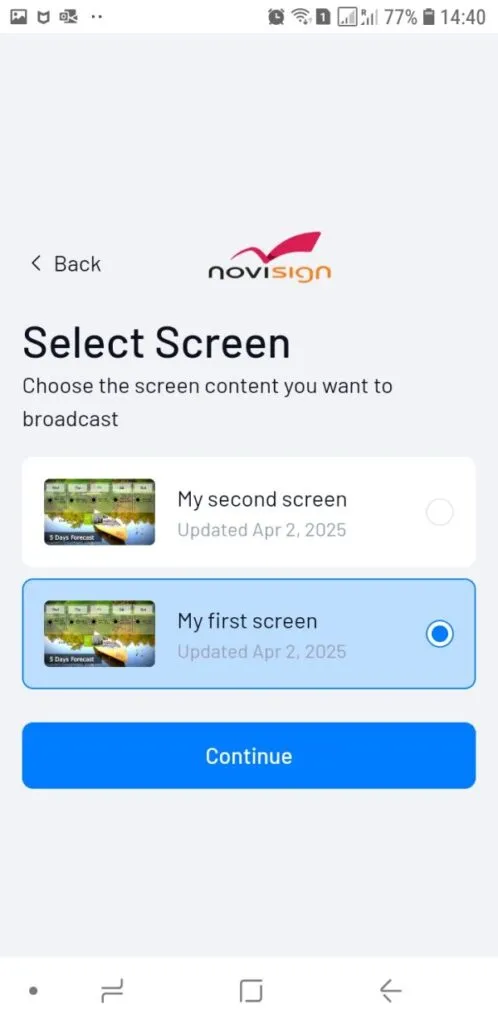
Select your account (if you have more than one).
Choose the screen you want this device to represent from the list shown.
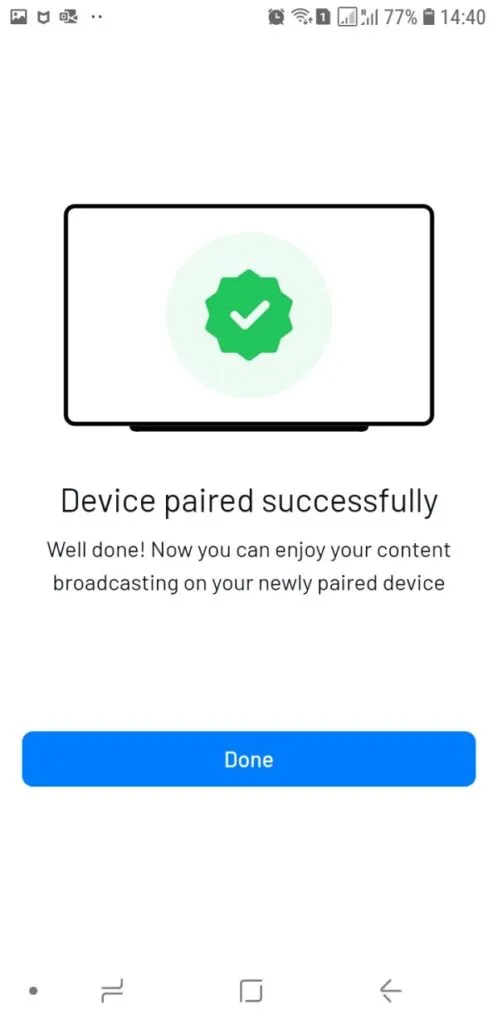
Click Continue to complete the pairing.
The device will automatically connect to the selected screen, download the playlist, and begin playback.
NOTE: Quick Link is not supported for accounts with 2FA (Two-Factor Authentication) enabled, so if your account uses 2FA, you will need to pair the device using the manual screen key or login method instead.
Configuring the NoviSign App
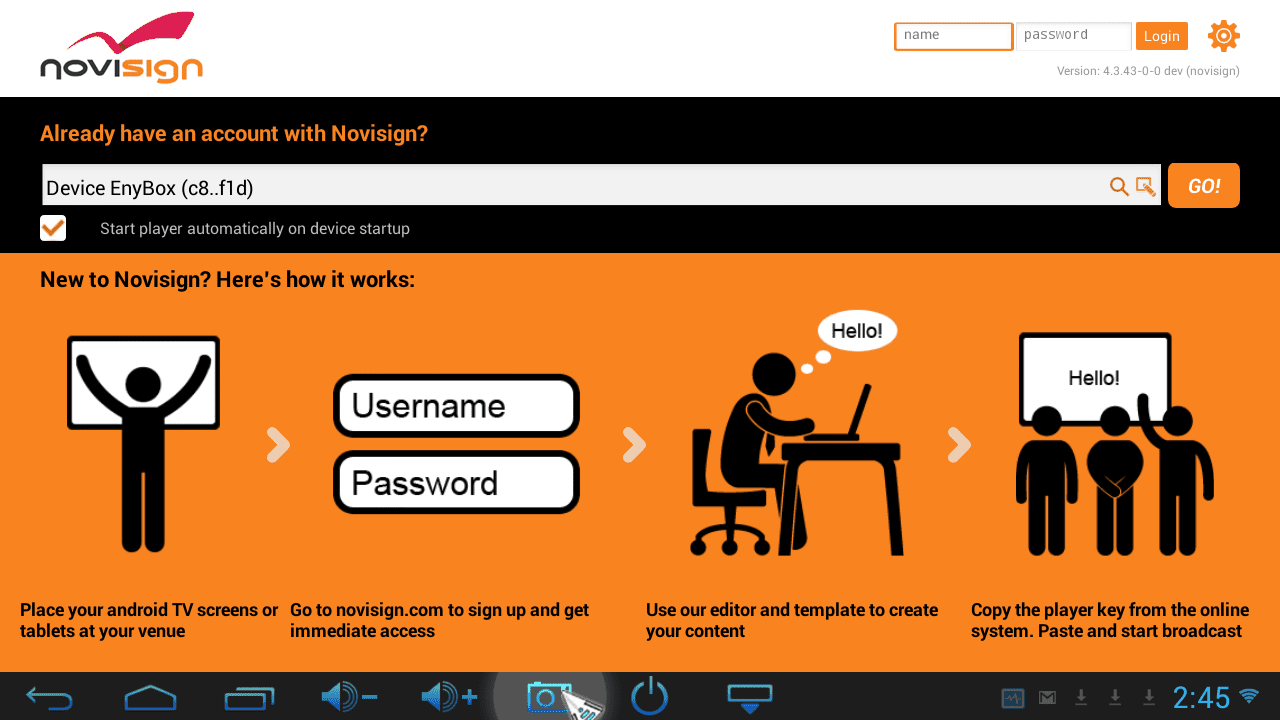
Open the NoviSign app Tap the NoviSign app icon on your Android home screen or find it under the “Apps” menu.
Enter the app’s entrance page You’ll see the entrance page (often called the “orange screen”).
Enable auto-start Check the box labeled “Start player automatically on device startup”. This ensures the app runs continuously 24/7.
Choose your screen playlist
You can type your screen key directly into the screen textbox if you already have one.
Recommended: Log in to your Studio CMS account using the Name and Password fields in the top-right corner.
After logging in, click the magnifying glass icon next to the screen key textbox to select your screen from your account—this avoids typing errors.
Start playback Press the “Go” button. The content will download, and once complete, the playlist will begin playing.
Verify playback Let the playlist run through one full cycle to make sure everything works smoothly.
Stop playback Right-click the mouse to stop the playlist and return to the entrance screen.
Access app settings Click the gear icon in the top-right corner to open settings.
Turn off notifications In the Display section, disable “Display Notifications” to avoid seeing error messages or alerts when the device is live.
Check device-specific settings If your Android device is on our recommended hardware list, visit that page to see if any other settings need adjustment based on your device brand and model.
Optimize performance settings Some settings may need to be changed now or in the future to improve performance or fix issues. For example, the “Video To Video Transition” setting’s default Auto/Performance mode may not work well on certain devices like the Minix Neo X10 mini—set it to “High Compatibility” or Disable instead. Here is a quick reference for the native Android app settings.
Return to entrance screen Right-click the mouse to go back.
Restart playback Press the “Go” button again to start the playlist.
Performance Optimization Tips
Uninstall Unnecessary Apps: Remove any apps not essential to signage playback, as they may interfere with performance.
Close Background Apps: Ensure other applications are not running before starting the NoviSign player.
Regularly Review Settings: Depending on firmware updates or device usage, occasional tweaks may be necessary to maintain optimal performance.
This document is continuously updated based on real-world feedback from our partners. If you have any suggestions, issues, or tips to share, please let us know—we’re committed to making your digital signage experience as smooth and effective as possible.
Watch a Tutorial Video
Need help getting started? Watch our step-by-step video guide to quickly learn how to install and set up the NoviSign app on your Android media player.