Sign up for a free evaluation account
Text Download ➞
Title Subtitle Download ➞

NoviSign External API Guide: From Studio Configuration to Player Setup

Overview

The NoviSign player supports integration with third-party APIs, allowing you to fetch JSON data and display it dynamically on your screens. This enables real-time content such as status boards, dashboards, order data, KPIs, and more.

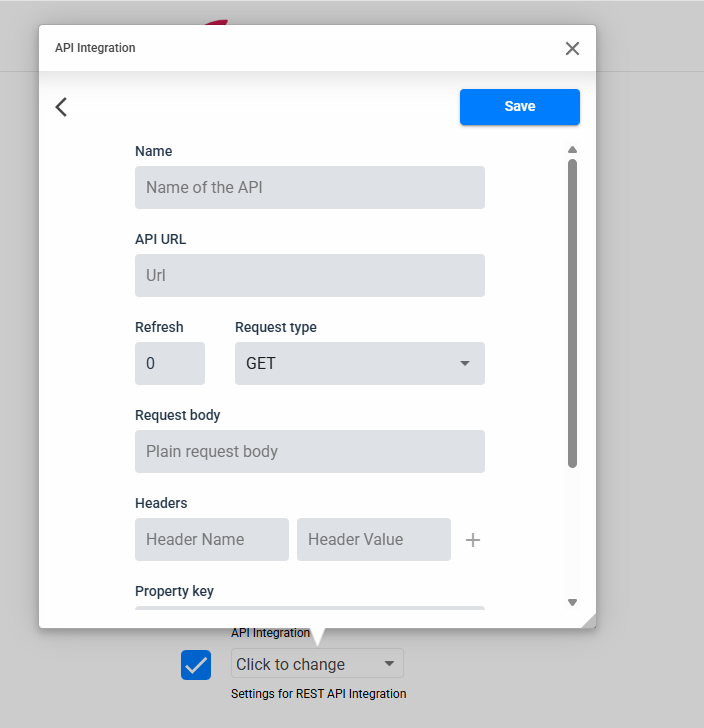
API integrations can be configured:

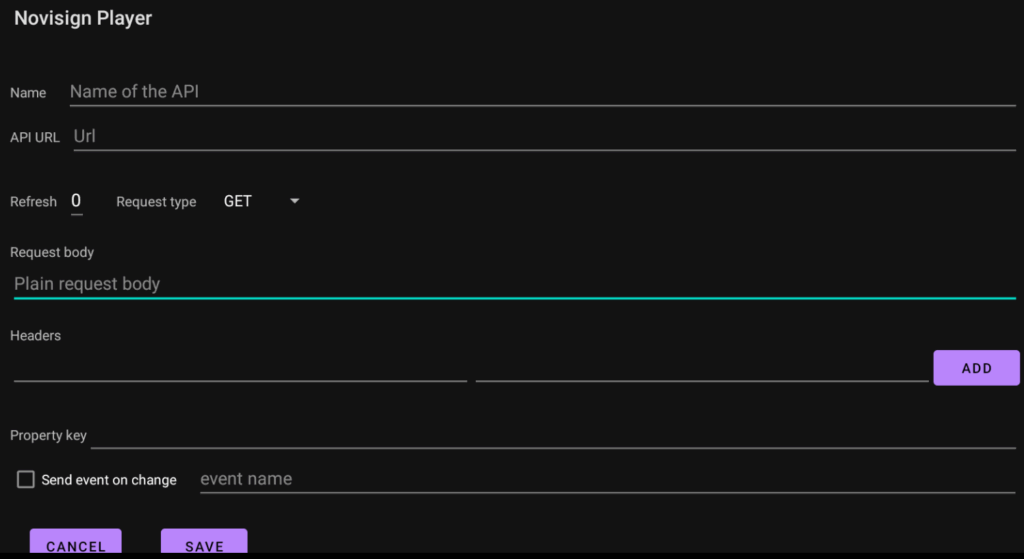
  • Directly on the player

  • From Studio using Screen Content configurations

Supported widgets

The expression syntax can currently be used with:

  • Text 

  • Label

  • Webpage

  • Web Video

  • Web Image

 Additional widget types may be supported in future releases.

Studio Configuration

Once the API connection is set up on the player or through Screen Content, the next step is to display that data on screen. This is done in Studio by adding variable expressions directly inside widget fields (such as Text, Label, Webpage, Web Image, and Web Video).

These expressions act as placeholders that are automatically replaced with real values from the API during playback. The player reads the JSON response returned by your endpoint, parses it, and inserts the requested value into the widget in real time.

To reference API data, a dedicated syntax format is used. This structure tells the system which API configuration to use and which JSON path to follow inside the response.

${@customapi.PROPERTY_KEY.JSON_PATH}

Element Meaning
@customapi Required prefix for API references
PROPERTY_KEY The identifier you set in the API settings
JSON_PATH The internal path inside the JSON structure you want to extract

{
“InProcess”: {
“0”: {
“orderApprovedTime”: “2023-01-01T00:00:00”,
“orderIDShort”: “1031”,
“orderID”: “83301031”
},
“1”: {
“orderApprovedTime”: “2023-01-01T00:00:00”,
“orderIDShort”: “1119”,
“orderID”: “83301119”
}
}
}


If the Property Key is:

myrestaurant

Then this expression:

${@customapi.myrestaurant.InProcess.0.orderIDShort}

Will return:
1031

Advanced API options

These settings are optional and extend functionality beyond basic API usage. Use them only if your integration requires event triggers, live changes on screen, or multiple values from one data source.

Triggers a player event automatically if a value in the JSON response changes.
This can switch content, refresh a page, or trigger an action.

How to use it

  • Enter an event name in the field (example: RFID:1)

  • When any JSON value updates → the player will issue the event

Useful for:

  • Real-time status boards

  • Line/queue updates

  • Automated content changes

If the API returns a list or repeated structure, access values by index.

Example JSON

“SHELF”: {
“Item0”: { “Name”: “Item A”, “Price”: “5.99” },
“Item1”: { “Name”: “Item B”, “Price”: “8.49” }
}

Expressions

${@customapi.SHELF.Item0.Name}
${@customapi.SHELF.Item1.Price}

You can combine API results with event-driven playlists (such as RFID or Dynamic Events):

Scenario Result
API value changes Trigger event & switch creative
New product data detected Show different screen segment
RFID + API combined Smart product display logic

Assign API Configuration from Studio

To send the API configuration to the player without configuring each device manually, you can use the

Studio → Configurations tab.

Go to:

Screen Content → Settings → Configurations → New Configuration → External Interfaces → Custom API Integration

  • Enter the same API details (Name / API URL / Headers / Property Key)

  • Test to confirm JSON data is returned

  • Save the configuration

Assigning API Configuration to a Screen

  1. In Screen Content, locate the target screen

  2. Click the three dots (⋮) beside it

  3. Select Set configuration

  4. Choose your Custom API Integration

Once assigned, the player will import the configuration automatically when that screen is selected.

CustomAPI

Player Configuration

Accessing the API Settings

On the player device, navigate to:
Settings → Advanced → External Interfaces → Custom API Integration

Create a New API Integration

Fill in the following fields:

Field Description
Name Give the integration a recognizable name
API URL Endpoint from which the JSON data will be retrieved
Refresh How often the API should request data (in seconds)
Request Type GET or POST (default: GET)
Request Body & Headers Only needed if the API requires tokens, authorization keys, or specific parameters
Property Key A unique keyword that will later be used in Studio to inject data into creatives

NOTE: The Property Key is important — you will reference it when building expressions inside Studio.

Testing & Saving

  • Click Test to validate the API.

    • If successful, the JSON dataset will appear in a preview window.

  • Click Save to store the configuration.

Screenshot 2025 12 01 121427