Sign up for a free evaluation account
Text Download ➞
Title Subtitle Download ➞

Import tool – Catalog Service API

Overview

The Catalog Tool in NoviSign is a powerful feature that lets you pull, store, and display data from external sources on your screens. It acts as a bridge between external APIs, files (like CSV/Google Sheets), and your NoviSign devices.

The tool gives you two main capabilities:

  1. Data Import → Easily convert a public CSV (or Google Sheet) into a usable JSON API for NoviSign creatives.

  2. Advanced API & Scheduling → Store structured or feed-like data, run scheduled tasks, and serve it back in JSON or format.

  3. Automatic Updates: Set a refresh schedule so your screens always show the latest information.

  4. Easy Integration in Creatives: Drop dynamic values (like event names, dates, or numbers) into NoviSign widgets.

Once the data is in the catalog repository, you can display it in Studio creatives and have it update automatically.

Key features

  • Bring in Your Own Data
    Connect data from outside sources — like a Google Sheet or CSV file — and use it in NoviSign. For example, you can pull in an updated list of events or daily statistics.

  • Automatic Updates
    Set your data to refresh on a schedule, so your screens always show the latest information without you having to update them manually.

  • Different Formats
    Your data can be read in standard formats that NoviSign understands:

    • JSON (used behind the scenes for most NoviSign integrations).

    • RSS (perfect if you want to plug data directly into the RSS widget).

  • Google Sheets & CSV Friendly
    If you keep your information in a Google Sheet or CSV file, you can publish it and connect it to NoviSign in just a few steps.

  • Easy Use in Creatives
    Once your data is connected, you can drop it into your designs (creatives) — for example, showing a name, date, or number directly inside a text widget.

Requirements

Before you start using the Import Tool, make sure of the following:

  • Imports Tool Enabled: Go to Admin → Account Settings and toggle the Imports Tool ON.

  • Public Source URL: Your data source must be publicly accessible.

  • Google Sheets Restriction: Sheets are private by default. Make them public before importing.

  • Correct Data Formatting: Dates, property keys, and column headers must follow the tool’s specifications.

Important Notes & Best Practices

Google Sheets:

  1. Create your sheet and add your data.

  2. Go to File → Share → Publish to the Internet → select Comma-separated-values (.csv).

  3. Copy the generated link — this makes your sheet publicly accessible.

CSV Files:

  • Updates may take a few seconds to appear in NoviSign Studio. Click Refresh in Studio to see changes.

  • Ensure dates match the format set in the Import Tool (e.g., yyyy-mm-dd2025-02-16).

Admin Settings:

  • Avoid spaces in the Import name or anywhere in the configuration. Spaces can break the generated API URL and prevent data import.

Studio Considerations:

  • Property keys cannot contain spaces (e.g., Event type). Use Event_type or Event-type instead. This ensures Studio can read and process your data correctly.

Setting Up the Catalog Tool

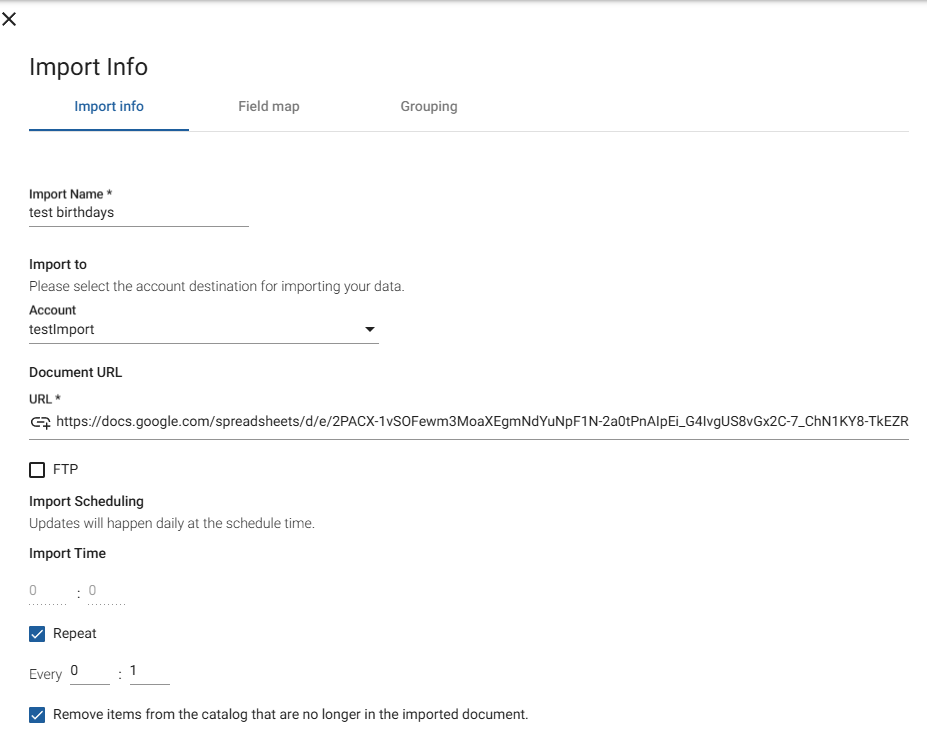
  1. Go to AdminUtilities tabImports.

  2. Click Create Import.

  3. Fill in the following details:

    • Import Name

    • Account (with “Imports” enabled)

    • URL (Paste your public CSV URL)

  4. Under Repeat, set how often the system should check for updates (in minutes) import tool

  5. Under Field Mapping, enter the column names you want to display (relevant only if need to override the column header name to custom value)

  6. Important: Under the Grouping tab:

    • If you do not have values for Start Date and End Date, do not select anything under the Date Format field.

  7. Set the Time Zone (used only with Date/Time. Not relevant for other cases)

  8. Click Save.

  9. After saving, a Custom API URL will be generated under the Import Info page. Open it to verify that your data is visible.

Once your catalog is created, you can retrieve items using the Catalog Service API. There are two main types of data you can access: Regular Items and Event Items.


A. Accessing Regular Items

To get standard catalog entries, use the following endpoint:

https://{studio-domain}/catalog/{account}/itemsgroup/{itemsgroup}

Path Parameters

  • {studio-domain} – Your dedicated NoviSign Studio domain.

  • {account} – The account ID associated with your integration. Find this in Studio Settings or the Admin Console.

  • {itemsgroup} – The main grouping key for your data (e.g., “Channel name” in Zapier or “Import name” in Imports).

Optional Query Parameters

  • group2 (String) – Filter items based on an additional grouping configured in Import settings.

  • sortBy (String) – Determines how results are sorted:

    • itemId (default)

    • created (by record creation time)

  • reverse (Boolean) – Set to true to reverse the sort order.

  • idForName (Boolean) – If true, item keys will use the actual itemId values. If false (default), keys are numbered incrementally (0, 1, 2, …).


B. Accessing Event Items (Time-Based Records)

For retrieving events with start and end times, use this endpoint:

https://{studio-domain}/catalog/{account}/events

Path Parameters

  • {studio-domain} – Your Studio domain.

  • {account} – The account ID used for the integration.

Required Query Parameters

  • group1 (Array[String]) – Primary grouping key(s) representing your integration channel (e.g., “Channel name” in Zapier). Multiple values allowed.

  • group2 (Array[String]) – Secondary grouping key(s) for filtering (from Import settings). Multiple values allowed.

  • sortGroup (Number) – Sort level:

    1. By group1

    2. By group2

    3. By group3

Time-Based Parameters

  • startTimeShift (Number) – Offset the current time by minutes (negative for past events).

  • endTimeShift (Number) – Extend the time window beyond the current time (in minutes).

  • filter (String) – Filter events by timing:

    • current – Ongoing events

    • future – Upcoming events

    • Leave blank or null – All events

  • untilEndOfDay (Boolean) – If true, retrieves all events until the end of the current day.


Optional Header for All Requests

  • X-API-KEY – Use if additional security is required. This header is optional and can be requested from your account administrator.

Once your catalog data is set up, you can configure your player to fetch and display this data dynamically using Custom API Integrations.


A. Setting Up a Custom API Integration

  1. Navigate to:
    Settings → Advanced → External Interfaces → Custom API Integration

  2. Create a new integration and complete the following fields:

    • Name: Give your integration a clear, descriptive name.

    • API URL: Enter the URL from which JSON data will be fetched.

    • Refresh: Set the refresh rate in seconds. Choose a value that balances data freshness and performance.

    • Request Type: Select GET (default) or POST depending on your API.

    • Request Body and Headers: Add any required parameters, such as static tokens. Leave empty if not needed.

    • Property Key: Choose a unique key. This key will be used in Studio to inject dynamic data into your creatives.

  3. Validate: Click Test to verify your configuration. If successful, the JSON payload will display on the screen.

  4. Save: Click Save to store the integration and proceed to assign it to your content.


B. Custom API Integration via Screen Content (Android Only)

For Android players, the Screen Content Configurations module allows you to configure and export Custom API integrations directly within Studio, avoiding individual device setup.

Steps:

  1. Navigate to:
    Screen Content → Settings → Configurations → New Configuration → External Interfaces → Custom API Integration → Click To Change

  2. Create and test the new configuration.

  3. Assign the configuration to specific screens:

    • In Screen Content, click the three-dot menu for a screen → Set configuration

    • Once applied, the player will automatically import the configuration when that screen is selected for playback.


C. Using Dynamic Variables in Studio

In Studio, dynamic content is displayed by using variable expressions that reference the API data at runtime.

Syntax Format:

${@customapi.PROPERTY_KEY.JSON_KEY1.JSON_KEY1_1…}
  • ${@customapi}: Reserved prefix indicating JSON data reference.

  • PROPERTY_KEY: The property key defined in your Custom API Integration.

  • JSON_KEY1, JSON_KEY1_1, …: Inner paths within the JSON structure containing your data.

Example:

JSON response:

{
"InProcess": {
"0": {
"orderApprovedTime":"2023-01-01T00:00:00",
"orderIDShort":"1031",
"orderID":"83301031"
},
"1": {
"orderApprovedTime":"2023-01-01T00:00:00",
"orderIDShort":"1119",
"orderID":"83301119"
}
}
}

With property key set to myrestaurant, the path:

${@customapi.myrestaurant.InProcess.0.orderIDShort}

will display 1031 in the widget.


D. Supported Widgets

The dynamic variable syntax works with:

  • Text

  • Label

  • Webpage

  • Web Video

  • Web Image

These widgets will automatically populate data from your API at runtime.
Final Steps & Tips

By following these steps, your NoviSign screens can now display dynamic, up-to-date content automatically. With the Import Tool and Custom API integrations, you can:

  • Pull data from Google Sheets, CSV files, or external APIs.

  • Configure your players to fetch and refresh data on a schedule.

  • Display live information in your creatives using simple variable expressions.

Once set up, your content stays fresh without manual updates, helping you deliver the right information to your audience at the right time.

Remember to test your screens after setup, monitor updates, and use clear property keys to ensure smooth operation.

Your digital signage is now fully dynamic, automated, and ready to engage your viewers!