Sign up for a free evaluation account
Text Download ➞
Title Subtitle Download ➞

How to Set Up an Interactive LED Screens in NoviSign

Overview

LED screens are commonly used in retail spaces, events, exhibitions, showrooms, and public venues where large, bright digital displays are needed. These screens can be connected to NoviSign players just like standard digital signage displays.

This guide explains how to configure your NoviSign setup for use with LED screens, including how to prepare your content, define the correct resolution, and set up interactive elements when needed. Once configured, you can manage and publish content to your LED screens the same way you would with any other NoviSign-powered display.

System requirements

Before setting up your LED screens with NoviSign, please make sure the following requirements are met:

  • Content must match the screen’s native resolution
    The native resolution of each screen is the maximum supported resolution for playback. Images and videos should not exceed the resolution of the display, as higher-resolution content can cause scaling issues or incorrect playback.
    For example, if a screen’s width is 1664 pixels, standard Full HD content (1920×1080) should not be used. Always adjust your content to match the actual screen resolution.

  • Each screen must be connected to its own dedicated media player
    Every physical screen requires a separate device and its own NoviSign license. One media player cannot control multiple screens.

  • Interactive events are supported only on Android players
    If your setup includes touch or other event-based interactions, the media players must run Android.

  • All players must be online and signed in to the NoviSign App
    Ensure each device is connected to the internet and properly logged into the NoviSign application before proceeding.

Important: Content resolution must never exceed the screen’s native resolution.

Step-by-Step Setup Instructions

When creating a creative, you first need to set the creative resolution according to the resolution of the media player.
For example, if the media player outputs Full HD, the creative canvas will be 1920 × 1080 by default.

However, in video wall setups (especially LED walls), the physical screen resolution is often smaller than the player output. Even though the player sends a Full HD signal, only the screen’s native resolution will actually be displayed.

To avoid placing content outside the visible area, you must create a visual framework that represents the exact screen boundaries.

How to do it

  1. Go to Creatives and create a new creative (using the player’s resolution, e.g. 1920 × 1080).

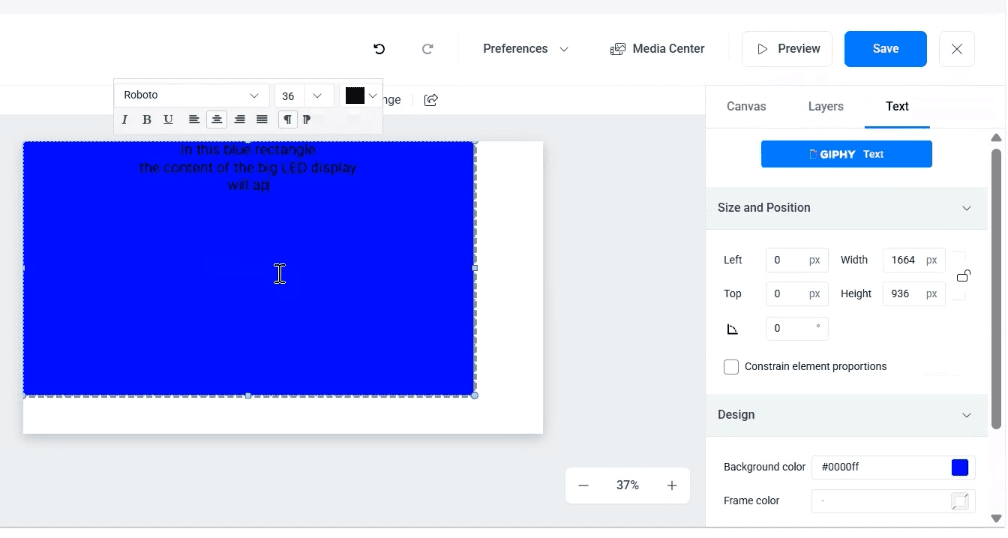
  2. Add a Text widget (used only as a reference frame).

  3. Select the widget and, on the right-hand side, open Size and Position.

  4. Set the width and height to match the native resolution of the screen
    Example: 1664 × 936.

  5. Position the widget starting from the top-left corner (0,0).

This rectangle represents the actual visible area of the screen.
Anything placed outside this rectangle will not appear on the LED/LCD display.

Important

  • Treat this rectangle as your content boundaries.

  • When adding videos or images, make sure they fit completely within this area and do not extend beyond it.

  • Content placed outside the rectangle may be cropped or not displayed at all.

    1. Save the creative.

Videowall framework

This example demonstrates a more advanced video wall setup, where large and small landscape screens change their content simultaneously using buttons on a control display (for example, switching between Cars and Kitchen).

If you do not require interactive content switching or a control panel, you can create standard video wall content and skip Steps 3 and 4. In that case, simply publish your creatives to the video wall as usual.

Creatives required for this example

For this interactive setup, you will need five separate creatives:

  1. Kitchen – Big Screen

  2. Kitchen – Small Screen

  3. Cars – Big Screen

  4. Cars – Small Screen

  5. Control Display (contains buttons)

Each creative must:

  • be built using the framework from Step 1

  • match the resolution of its target screen

  • keep all content within the visible boundaries

How it works

  • The big and small screens display different versions of the same content theme.

  • The control display sends commands using buttons.

  • When a button is pressed, all connected screens update at the same time.

Once these creatives are prepared, you can continue with Steps 3 and 4 to enable event-based control, or publish the content directly if no interaction is required.

video wall content creation

This setup relies on custom events to trigger synchronized content changes.

Custom events must be enabled on your NoviSign account before continuing.

Please contact NoviSign Support and request that custom events be added to your account.

The following steps must be performed on each Android media player connected to the video wall.

Why this is required

Content switching is triggered by HTTP events sent to a specific media player.
To ensure reliable delivery:

  • each player must have a static IP address

  • each player must be able to listen for incoming HTTP events

Player-side setup steps

For each Android media player, do the following:

  1. Set a static local IP address
    Assign a fixed IP address and write it down for reference.

  2. Enable Connection Parameters

    • Open NoviSign App settings

    • Scroll to the bottom

    • Turn on Connection Parameters

Connection parameters

Webserverparam

3. Enable RFID Reader

    • Open Advanced Settings

    • Go to External Interfaces

    • Turn on RFID Reader

External interfaces

RFID

No physical RFID hardware is used. This setting enables the player to receive external HTTP event triggers through your network/router.

  1. Open the Control Display creative.

  2. Select the first button widget.

  3. On the right-hand panel, open Touch Properties.

  4. Choose Send Event to Player.

  5. Enter the IP address of the target media player (use the static IPs you recorded earlier).

  6. Enter the Port number provided for event communication.

  7. In the Send Event field, choose the relevant event from the list (these events were added to your account by the Support team).
    Select the event that corresponds to the content you want this button to trigger (for example, Kitchen or Cars).

  8. Click OK.

setting up the creative

Repeat these steps for the second button, selecting the event linked to the other content.

  1. Click Save Creative.

NOTE:

If you are sending events to more than one Android media player, you must enter all target IP addresses in the Touch Properties settings.

When adding multiple IP addresses, they must be separated by a semicolon ( ; ).

Example:
192.168.1.101;192.168.1.102;192.168.1.103

This ensures that the event is sent to all relevant Android media players at the same time.

Now you will create three playlists: one for the control screen and one for each screen size in the LED wall.

  1. Go to the Playlists tab.

  2. Click Create Playlist.


1. LED Project – Controller Playlist

Add the Control Display creative to this playlist.
This playlist will be assigned to the control screen.


2. Big LED Playlist

This playlist is for the large LED screens.
Add the following creatives:

  • Default – Big LED (runs when no button is pressed)

  • Big LED – Kitchen

  • Big LED – Cars


3. Small LED Playlist

This playlist is for the small LED screens.
Add the following creatives:

  • Default – Small LED (runs when no button is pressed)

  • Small LED – Kitchen

  • Small LED – Cars

In this step, you will define which creatives should play when a button is pressed on the control display.

Enable touch events on the Controller playlist

The control screen must be allowed to detect and send touch events.

  1. Go to the Playlists tab.

  2. Open the LED Project – Controller Playlist.

  3. Click the calendar icon next to the creative.

  4. Go to the Events tab.

  5. Enable Touch Events.

This allows the control display to respond when a user presses a button.

Click Save.

touch events

Assign custom events to the content creatives

Now you will define which creatives should play when specific events are received.

  1. Go to the Playlists tab.

  2. Open the Big LED Playlist (you will repeat the same steps later for the Small LED Playlist).

  3. Next to the creative you want to trigger (for example Big LED – Kitchen), click the calendar icon.

  4. Go to the Events tab.

  5. Turn on Custom Event.

  6. From the list, select the event that matches this content (for example Kitchen).

  7. Turn on:

    • Play on Event

    • Event cannot be interrupted

  8. Click Save.

Repeat these steps for:

  • Big LED – Cars

  • All corresponding creatives in the Small LED Playlist

Each creative must be linked to the correct event that was configured earlier by the Support team.


What this does

When a button is pressed on the control display:

  • An event is sent to the media players

  • The matching creative (Kitchen or Cars) immediately starts playing

  • Because “Event cannot be interrupted” is enabled, the content will play fully without being overridden by other items in the playlist

If no event is triggered, the playlist will continue playing the Default creative.

Playlist setup

  1. Go to the Screens tab.

  2. Click Create Screen.

  3. Give the screen a clear name (for example, Big LED Screen, Small LED Screen, or Control Screen).

  4. Assign the relevant playlist to the screen:

    • Controller Playlist → Control Screen

    • Big LED Playlist → Big LED Screen(s)

    • Small LED Playlist → Small LED Screen(s)

  5. Click Create (or Save/Publish, depending on your interface).

Repeat these steps for each screen in your setup.

Setup Complete

Your interactive LED screen setup is now fully configured.

At this point:

  • Each screen displays the correct content as defined in its playlist

  • The control display can send touch events

  • Media players receive events and switch content simultaneously

  • Default content plays when no interaction occurs

This setup allows you to create engaging, dynamic experiences where multiple screens respond instantly to user interaction.

If you need to update content later, simply edit the relevant creatives or playlists — there is no need to repeat the full setup process.