Sign up for a free evaluation account
Text Download ➞
Title Subtitle Download ➞

Sony AITRIOS Camera Integration Guide

Overview

This guide explains how to set up a Sony AITRIOS-compatible smart camera and connect it to our Android application in order to receive AI inference metadata.

The Android app is installed on a separate Android player or Android box (not on the camera itself).
The camera sends inference metadata over the network to the Android app, which can then trigger events in creative screens.

Supported Camera Models

  • AIH-IVRW2

  • CSV26

Supported Firmware

  • AITRIOS Firmware Version: V2

Goal

By the end of this guide, you will:

  • Bring the camera online

  • Register it in the AITRIOS Console

  • Install required firmware, edge app, and AI model

  • Connect the camera to the Android app

  • Verify that inference metadata is received successfully


Setup Process

Prerequisites

Before you begin, make sure you have:

  • A Sony AITRIOS camera (AIH-IVRW2 or CSV26)

  • The camera updated to firmware v2 with an AI model and edge application pre-installed

  • A Sony AITRIOS account and Console access

  • Network connection (LAN or Wi-Fi)

  • API credentials (Device ID, Client ID, Client Secret) from AITRIOS Console

  • Our Android app installed on a test device

Physical Setup

  1. Unbox the camera and check included accessories.

  2. Power on using the adapter or PoE.

  3. Connect to your network:

    • Ethernet (recommended): plug in directly.

    • Wi-Fi: In the next step (Enrollment)

For this section: Admin Access Required

Provisioning in the AITRIOS Portal (Admin Access Required)

  1. Sign in to the AITRIOS Portal.

    SonyAtrios portal

  2. Register a new project

     Register new project manual

    Register new project

  3. Open your user project.

    New project

  4. In the left menu, click Project Management → Client App Management.

    Edit new project

  5. Click Register New (only available to admins)

    Register new atrios project

  6. Enter a Client App Name.

  7. Select the following roles:

    • Console Admin

    • AI Model Admin

    Register client app

  8. Click Register
  9. If Client Secret is not visible, In the Client App Details screen, click Issue Secret. Save the Client Secret in a safe place — you will not be able to view it again in the console.

    Client secret

  10. n the Client Apps List screen, copy and save the Client ID.
    Client ID

    Save these credentials!

    These credentials must be retained for future reference.

Enrolling the Camera in AITRIOS Console

  1. From the Portal, Go to the AITRIOS Console.

Console

  1. Make sure you are on version V1.
    Version 1

  2. Click Edge Provisioning on the left menu.Edge Provisioning

  3. In the NTP text box, enter: pool.ntp.org
    NTPNOTE: When you first enter this screen, there’s a place holder for NTP. You need to override it.

  4. For AIH-IVRW2 (wireless version):

    5.1. Enable Configure Network Settings.

    5.2. In Wi-Fi SSID section, enter your Wi-Fi SSID and Wi-Fi Password.

  5. Click Generate.
    NTP generate

  6. Scan the QR code with the camera.

Important – QR Scanning May Take Time
The camera may take longer than expected to recognize and complete the QR scan.
This is a known behavior during AITRIOS enrollment.
Please hold the QR code steady and allow sufficient time before retrying.

QR code

Cannot scan the Enrollment QR code or the service QR code

The Enrollment QR code and the service QR code should be displayed at about 9 cm on a side, and scanned from a distance of about 15 cm with the Edge Device. Please pay attention to the size.

If the code still cannot be scanned successfully, please check the following:

  • Is the QR code too close or too far?

  • Is the QR code read from the front?

  • If the QR code is printed on paper, is the paper folded or bent, or is the QR code blurred?

  • If the QR code is displayed on a screen, make sure there are no reflections from lighting or dirt on the screen.

TIP from the developer: If the camera struggles to scan the QR code, try displaying it on a different screen — ideally one with a matte (non-glossy) surface.

Bright or reflective screens can cause glare and make scanning difficult.

  1. Once the camera scans the QR successfully (Leds are green, red, green), go to Manage Devices in Console and confirm the camera appears in the list.

  2. Retrieve the Device ID from the device list (starts with Aid…) and save it for later.

Device ID

Save the Device ID with the other credentials.

You now have your Device ID, Client ID, and Client Secret. These values are needed for the app setup.

Firmware Installation and Upgrade

Install Latest V1 Firmware

  1. Go to Deploy to Device.

  2. Select V1_latest_wireless.

  3. Choose the camera and deploy.

  4. Wait until the status shows Success.

Install V1 firmware

5. Verify firmware details in the device status page.

5.1 Click on the History tab

5.2 Expand the relevant line

5.3 Wait until the Deployment process is completed (“Deploying” will change to “Success”).

Device status

Verify that the installation was successful

  1. Click on Manage Device on the left menu

  2. Click on the device

  3. On the right menu click on Status and then on Device

  4. Check the following fields:

    1. Sensor Chip – 020401

    2. Sensor Chip(loader) – 020301

    3. Model Version ID

      1. Main Chip – 070102WS

      2. Main Chip(loader) – 010300

Connected device

V1 to V2 upgrade

  1. On AITRIOS Console, click on Deploy to Device on the side menu

Deploy to device

  1. Click on v1_tov2_mainchip

  2. Click Deploy on the left

v1 to v2

4. Choose the device to install the firmware on and click Deploy.

Deploy from v1 to v2

  1. Click on the History tab

  2. Expand the first line

  3. Wait until the Deployment process is completed (“Deploying” will change to “Success”)

Deploying

NOTE:

Sometimes the deployment will fail.

Don’t try to deploy again, instead check if the device is showing the V2 tag (next step).

  1. Click Manage Device on the left menu

  2. Check that the device has V2 blue tag next to its name.

V2

Upgrade to V2 latest

  1. Click V2

  1. Click Deployments on the left menu

    V2deployments

  2. Click on AIH-IVRW2 on the first line

    AIH deployment

  3. Click deploy
  1. Click on Select Devices

select devices

  1. Choose the device to install the firmware on.

  2. Click Apply

    Device to install firmware

    1. Click Deploy

      Deploy device

      1. Click on the first line (of the deployment)

    Deployment process

    1. Wait until the Deployment process is completed (“Deploying” will change to “Success”).

Successful deployment

Installing Edge App

  1. Go to AITRIOS Console.

  2. On the menu on the left, click on Deployments.

Installing the edge app

  1. On the top right, click on + Deploy

deploy edge app

  1. Click Select Software.

  2. On the top menu, choose Edge Application.
    Edge application

  3. Choose the application you would like to install (gaze_patch6.3.2 if not instructed otherwise).

  4. Click Apply.

  5. Click Select Devices.

  6. Choose the device you want to deploy the edge app and click Apply.
    Deploying Edge app

    1. Click Deploy

    2. You will see a new line in the deployments table. If not, click Refresh.

    3. Click the new lineDeployment

    4. Wait until the Deployment process is completed (“Deploying” will change to “Success”).

Verifying

  1. Go back to Devices screen.

  2. Click on the device you deployed to.

  3. Click on Edge App at the top of the bottom screen.

  4. Verify that the Edge App is installed.

Verifying

Installing AI model

  1. Go to AITRIOS Console.

  2. On the menu on the left, click on Deployments.

Installing AI model

  1. On the top right, click on + Deploy

  2. Click Select Software.

  3. On the top menu, choose AI Model

  4. Choose the application you would like to install (Studio_Gaze_6.3.2 if not instructed otherwise).

  5. Click Apply.
    Choose AI model

  6. Click Select Devices.
    Select devices AI model

  7. Choose the device you want to deploy the edge app and click Apply.
    Deploy devices

  8. Click Deploy

  9. You will see a new line in the deployments table. If not, click Refresh.

  10. Click the new line
    Deploying device

  11. Wait until the Deployment process is completed (“Deploying” will change to “Success”).

    Verifying

    1. Go back to Devices screen.

    2. Click on the device you deployed to.

    3. Click on AI Model at the top of the bottom screen.

    4. Verify that the AI Model is installed.
      Verifying AI model

Updating Edge App Configuration

  1. Go to Devices

  2. Click on the 3 dots (…) of the device you are using

Updating Edge App configuration

  1. Click on Update Module Configuration
    Update module configuration

  2. Choose JSON tab

  3. Make sure you are on the correct Module (“gaze…”)
    updating
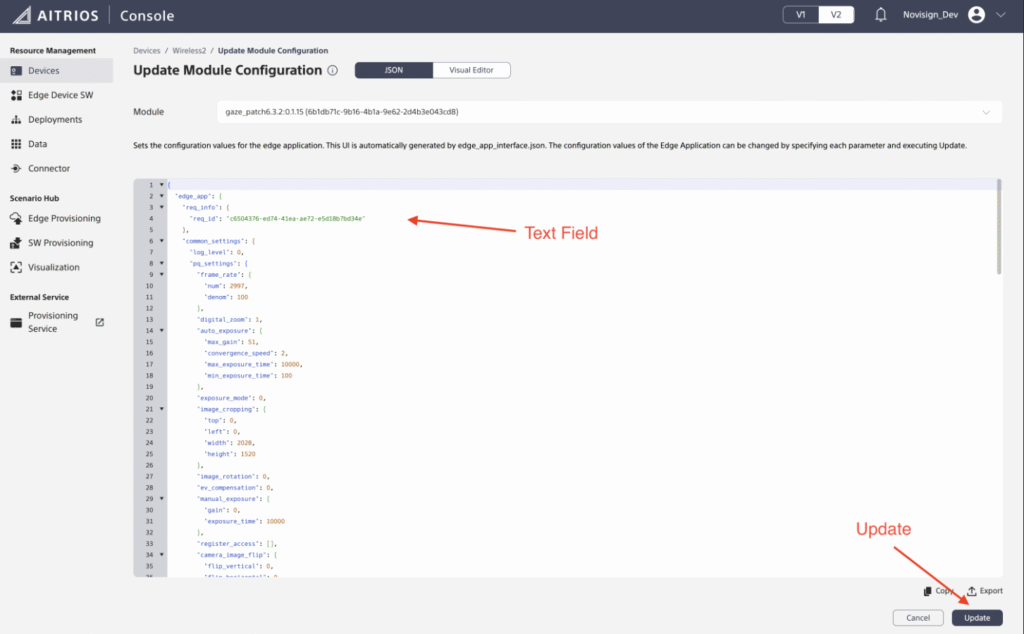
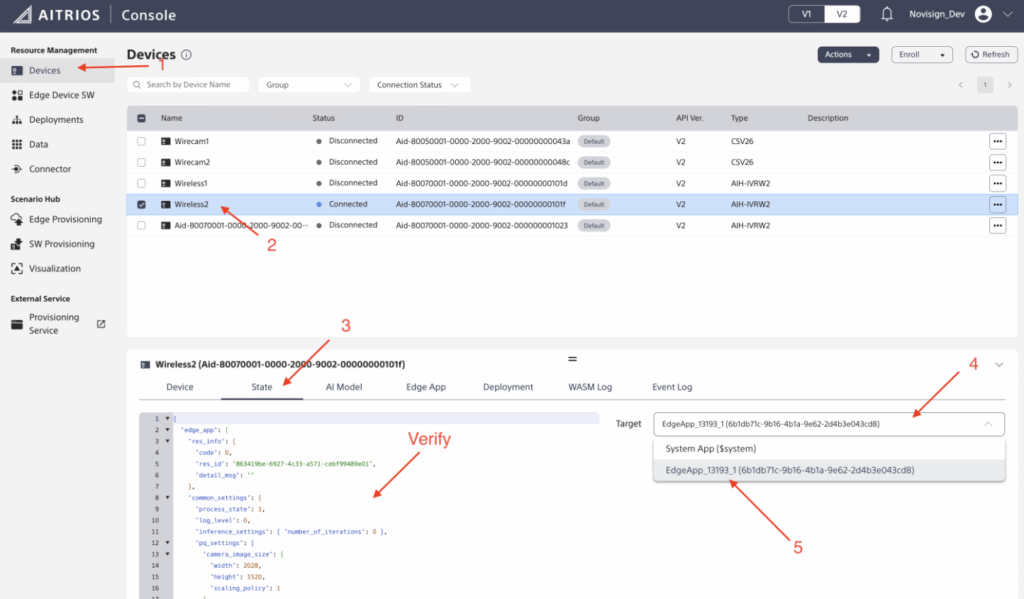
  4. Copy the following JSON to the text field:
    {
    “edge_app”: {
    “req_info”: {
    “req_id”: “c6504376-ed74-41ea-ae72-e5d18b7bd34e”
    },
    “common_settings”: {
    “log_level”: 0,
    “pq_settings”: {
    “frame_rate”: {
    “num”: 2997,
    “denom”: 100
    },
    “digital_zoom”: 1,
    “auto_exposure”: {
    “max_gain”: 51,
    “convergence_speed”: 2,
    “max_exposure_time”: 10000,
    “min_exposure_time”: 100
    },
    “exposure_mode”: 0,
    “image_cropping”: {
    “top”: 0,
    “left”: 0,
    “width”: 2028,
    “height”: 1520
    },
    “image_rotation”: 0,
    “ev_compensation”: 0,
    “manual_exposure”: {
    “gain”: 0,
    “exposure_time”: 10000
    },
    “register_access”: [],
    “camera_image_flip”: {
    “flip_vertical”: 0,
    “flip_horizontal”: 0
    },
    “camera_image_size”: {
    “width”: 2028,
    “height”: 1520,
    “scaling_policy”: 1
    },
    “auto_white_balance”: {
    “convergence_speed”: 6
    },
    “white_balance_mode”: 0,
    “ae_anti_flicker_mode”: 0,
    “auto_exposure_metering”: {
    “top”: 0,
    “left”: 0,
    “right”: 0,
    “bottom”: 0,
    “metering_mode”: 0
    },
    “manual_white_balance_preset”: {
    “color_temperature”: 0
    }
    },
    “port_settings”: {
    “metadata”: {
    “path”: “meta”,
    “method”: 2,
    “enabled”: true,
    “endpoint”: “http://192.168.1.64:8080”
    },
    “input_tensor”: {
    “path”: “image”,
    “method”: 2,
    “enabled”: false,
    “endpoint”: “http://192.168.1.23:8080”
    }
    },
    “process_state”: 1,
    “codec_settings”: {
    “format”: 1
    },
    “inference_settings”: {
    “number_of_iterations”: 0
    },
    “number_of_inference_per_message”: 1
    },
    “custom_settings”: {
    “ppl_parameter”: {
    “max_age”: 6,
    “min_hits”: 3,
    “log_level”: “critical”,
    “min_height”: 10,
    “age_ID_size”: 15,
    “cluster_ROI”: {
    “p1_x”: 0,
    “p1_y”: 0,
    “p2_x”: 512,
    “p2_y”: 0,
    “p3_x”: 512,
    “p3_y”: 384,
    “p4_x”: 0,
    “p4_y”: 384
    },
    “age_buf_size”: 5,
    “max_trackers”: 20,
    “face_min_size”: 20,
    “iou_threshold”: 0.2,
    “min_bbox_area”: 100,
    “sdk_log_level”: “close”,
    “yaw_threshold”: 45,
    “gender_ID_size”: 15,
    “enable_zero_age”: true,
    “gender_buf_size”: 5,
    “pitch_threshold”: 90,
    “watching_region”: {
    “max_yaw”: 45,
    “min_yaw”: -19,
    “max_pitch”: 15,
    “min_pitch”: -15
    },
    “gender_threshold”: 0.55,
    “enable_age_smooth”: true,
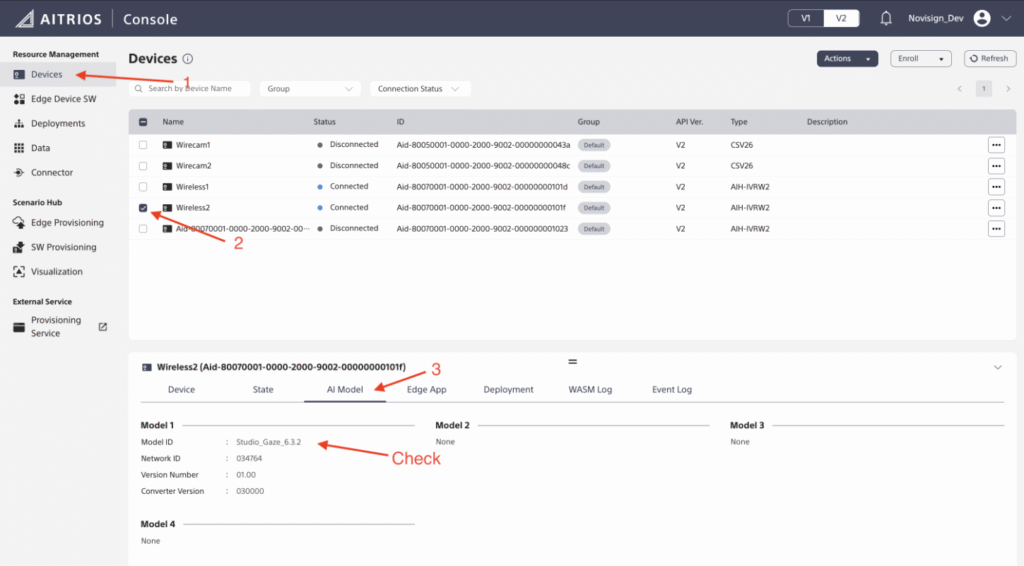
    “ai_model_bundle_id”: “034764”,
    “enable_gender_vote”: true,
    “face_detection_ROI”: {
    “p1_x”: 0,
    “p1_y”: 0,
    “p2_x”: 512,
    “p2_y”: 0,
    “p3_x”: 512,
    “p3_y”: 384,
    “p4_x”: 0,
    “p4_y”: 384
    },
    “max_body_detection”: 30,
    “enable_summary_mode”: false,
    “gaze_focus_threshold”: 0,
    “back2camera_threshold”: 0.45,
    “enable_invalid_gender”: false,
    “enable_watching_region”: true,
    “trajectory_db_lifetime”: 10,
    “body_detection_threshold”: 0.32,
    “face_detection_threshold”: 0.315,
    “enable_gaze_time_functions”: true,
    “enable_age_smooth_continuous”: false,
    “face_detection_nms_threshold”: 0.5,
    “enable_gender_vote_continuous”: false,
    “inference_result_filter_enable”: true
    }
    }
    }
    }

update text field

  1. Click on the Update button

Verifying

  1. Go back to Devices screen.

  2. Click on the device you deployed to.

  3. Click on State on the top of the bottom screen.

  4. Click on Target and choose “Edge App…”

  5. Verify that the JSON you inserted is the one you see

last verification

You’ve now installed all the necessary firmware and are ready to proceed to the next step.

Recommended Physical Installation of the Camera

  • Mount the device securely (wall, ceiling, tripod)
  • Camera Height: 1.6 – 3.0 m (AI model functions above 3.0 m, but optimal accuracy is achieved within this range).

  • Camera Angle: 0° (horizontal) to 30°.

Integrating with the Android App

  1. Open the Android app.

  2. Go to Settings → External Interfaces → Camera.
    external interfaces cameraCamera

  3. Enable Use External Camera.

  4. Select Sony as the camera vendor.

  5. Enter the following values from AITRIOS Console:

    • Device ID

    • Client ID

Client Secret

NOTE:

Please note that the values must be added by copy-pasting them — not by entering them manually.

You can either:

– Connect your PC using the ADB Connect method (advanced), or

– Add the values to a text file, save it on a USB stick, plug the USB stick into the device, and copy-paste the values from the file directly to the relevant app settings.

6. Set the Player device’s local IP address as the Host IP.

7. Click Start.
Adding values

8. Once the status shows Running, the player will begin listening to inference data pushed from the camera.

9. Go to the app’s home page and start a creative screen with NoviSign events to use the incoming metadata.

Testing & Validation

  • Confirm the app reports Running after configuration.
    Camera verification
  • Trigger activity in the camera’s field of view (point the camera at a person).

  • Verify NoviSign events are appearing on the creative screen.

Troubleshooting

  • No data received: Verify Device ID, Client ID, and Client Secret are correct.

  • Auth errors: Regenerate and re-enter API credentials in Console.

  • Connectivity issues: Check that the Host IP matches the player device’s local IP.

  • Status stuck on “Start…”: Restart the app and confirm the camera is online in Console.

  • //TODO – add a section about changing WIFI on the wireless camera

Cannot scan the Enrollment QR code or the service QR code

The Enrollment QR code and the service QR code should be displayed at about 9 cm on a side, and scanned from a distance of about 15 cm with the Edge Device. Please pay attention to the size.

If the code still cannot be scanned successfully, please check the following:

  • Is the QR code too close or too far?

  • Is the QR code read from the front?

  • If the QR code is printed on paper, is the paper folded or bent, or is the QR code blurred?

  • If the QR code is displayed on a screen, make sure there are no reflections from lighting or dirt on the screen.

TIP from the developer: If the camera struggles to scan the QR code, try displaying it on a different screen — ideally one with a matte (non-glossy) surface.

Bright or reflective screens can cause glare and make scanning difficult.

By the end of this guide, your camera should be online and streaming inference metadata directly into our app, enabling NoviSign events in creative screens.

NoviSign Digital Signage
Privacy Overview

This website uses cookies so that we can provide you with the best user experience possible. Cookie information is stored in your browser and performs functions such as recognising you when you return to our website and helping our team to understand which sections of the website you find most interesting and useful.