This guide walks you step by step through the process of installing and configuring the NoviSign player on LG webOS–based digital signage displays.
LG offers a wide range of smart displays running its proprietary operating system, webOS. The NoviSign webOS player is supported only on webOS version 4.x and above.
The application was tested on a 43″ LG display (model 43UH5F-H). The player is based on NoviSign’s HTML player (https://app.novisign.com/wplayer) and is used as the digital signage playback engine on webOS devices.
This is a living document, built on real-world usage and feedback from our beta testers, and it will continue to be updated over time. We welcome your feedback and recommendations to help us further improve this guide.
IMPORTANT NOTE:
The NoviSign IPK installation is supported only on LG webOS displays marked as Digital Signage (professional line). Commercial-lite / consumer TV models are not supported for IPK installation. For other webOS-based TVs, we are working on making the player available via the LG Smart App Store.
webOS versions 2.x and 3.x are not supported. The NoviSign webOS player requires webOS 4.x or later.
NoviSign does not currently support LG webOS 8. The webOS player is officially supported on webOS 4.x–7.x only. Compatibility with webOS 8 is under review, and we will update this article once support becomes available.
Set up your TV
After the TV is powered on, press the gear button on the remote control (you can also select the gear icon that appears in the top-right corner of the screen). This will open the Settings menu on the left side of the screen.
Set screen orientation (optional): If the display will be used in portrait mode, enter Display → Rotation and set the Screen Rotation accordingly.
Disable energy saving mode: Enter Display → Advanced Settings → Energy Saving and turn off Smart Energy Saving.
Disable automatic power-off (recommended): Enter General → Power and turn off No IR Power Off (4 Hour).
Note:This option is enabled by default on factory-shipped displays and causes the screen to power off after four hours, which is not suitable for digital signage use.
Configure network connectivity: If the TV is connected via Ethernet, no additional configuration is required. To use Wi-Fi, enter General → Network and configure the wireless connection.
Verify date and time settings: Enter General → Time & Date and ensure the correct time zone, date, and time are set.
Install the webOS app
Using the TV remote control, press the gear button (or select the gear icon that appears in the top-right corner of the screen). This opens the Settings menu on the left side of the screen.
Navigate to Ez Setting → SI Server Setting, and select SI Server Setting again to enter the configuration screen.
In the SI Server Setting screen, configure the following options to install the NoviSign IPK (the webOS application installation file) as the signage application:
In the same menu, configure the remaining settings:
Application Launch Mode: set to Local (ensures the app runs locally, even if the device is temporarily offline)
Application Type: set to IPK
Press the Remote button (located to the left of Local Application Upgrade). A confirmation dialog will appear — confirm the upgrade to begin installation.
Once the upgrade process is complete, turn off the TV using the remote control.
Wait 10 seconds, then turn the TV back on. The TV will boot and automatically launch the NoviSign app.
Note: Pressing the Home button on the remote opens the webOS home screen. The NoviSign app will appear as an application icon in the bottom app bar and can be launched manually from there if needed.
USB Installation Method
Prepare a USB flash drive and create a root-level folder named application (all lowercase).
Copy the IPK file into the application folder and rename it to: com.lg.app.novisign.ipk
Connect a USB hub to the LG TV’s USB port, and connect the following devices to the hub:
USB flash drive
Keyboard
Mouse
Using the TV remote control, press the Settings (gear) button to open the Settings menu.
Navigate to SI Server Settings.
In SI Server Settings, configure the following options:
SI Server URL: https://app.onsignage.com/wapp/webos/signage.prod.si.ipk
Application Launch Mode: set to Local
Application Type: set to IPK
USB Application Upgrade: set to USB
When the message “The upgrade completed” appears, reboot the display.
After the display restarts, the NoviSign app will be installed automatically. The installed IPK version is displayed in the bottom-left corner of the screen.
Configure the webOS app
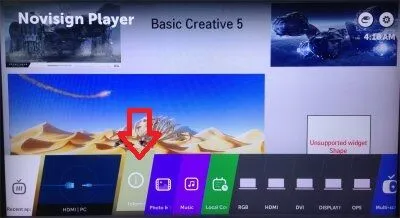
Once the app is installed, the app will go to its entrance screen. After the “Screen:” type your screen key in the textbox. The screen key can be taken from the screen which you have created in your online Studio account. This will be the permanent ID of this TV display.
Check the “Auto start” checkbox. This will tell the app to auto start playing the content after reboot.
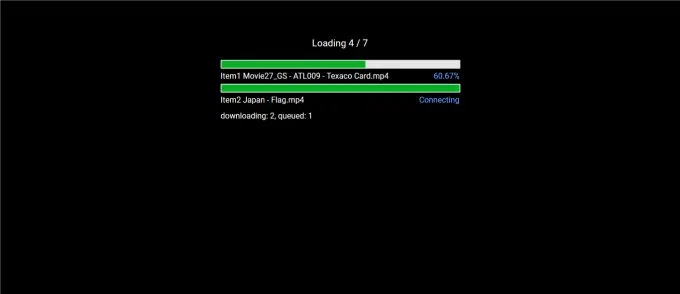
Press the “Play” button and the app will start downloading the content. When the content is fully downloaded to the app’s cache, it will start playing it. Watch one cycle of the content to see that all works ok.
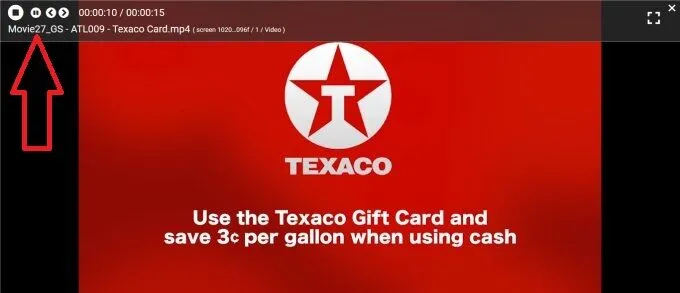
In order to stop the running app, you need to click the mouse cursor in the top side of the display and the playback control bar will appear. Then just click the square stop button in the left side of the control bar and that will take you to the entrance screen of the app, where you’ll be able to make changes and access the settings screen.
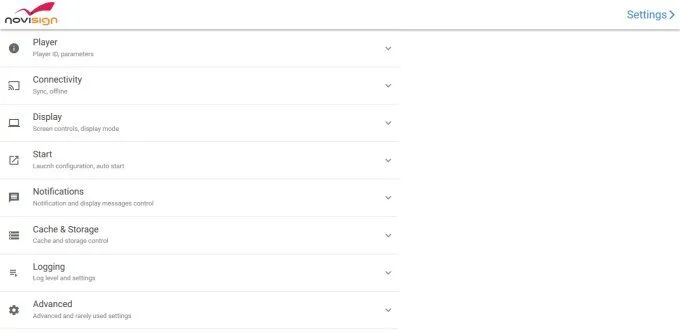
It is time to make last configuration to the app. So for that, press the gear icon in the top right corner of the entrance screen. This will take you to the settings screen of the app.
In the settings, find the “Display Notifications” setting (under the “Notifications” block of settings) and uncheck it to turn it off, as you do not want that notification will appear on a live display.
Exit the settings screen using the Esc key of the WiFi mini keyboard or the back button of the TV remote control, back to the entrance screen of the app.
Press the “Play” button again and the app will start playing the content. Mission completed.
Please notice that actions such as play, stop, start, skip to the next creative and go back to the previous creative can be done using the TV remote control buttons as well.
How to create content
If you want to learn how to create content for your digital signage Samsung TV, using our online Studio CMS, please visit our step-by-step user guide.
The webOS app limitations
As of February 2024, the following limitations apply to the NoviSign webOS player:
Playback & synchronization
Video-to-video transitions may not be smooth.
The Synchronization feature is not supported.
Widgets – not supported
Ustream widget
FTP widget
Ad widget
HTML Embedded widget
Streaming widget (M3U8 format)
Widgets – limited support
Touch widget is supported; however, touch properties for other widgets are not available.
Dashboard widget is supported only for Power BI and requires webOS version 4.x or later.
Interactivity & advanced behaviors
Launching third-party applications via touch is not supported.
Launching third-party applications via swipe is not supported.
Auto-scroll for the Webpage widget is not supported.
App behavior & settings limitations
Skipping or displaying incomplete creatives/slides cannot be configured.
Showcase (screen saver) mode is not available.
Playlist update timing (controlling when a running playlist stops after an update finishes downloading) cannot be configured.
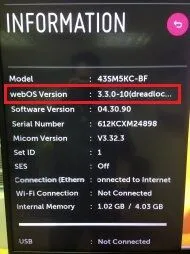
Checking Your LG webOS Version
Using the TV remote control, press the gear button to open the Settings menu on the left side of the screen.
Select General.
In the General menu, select System Information.
An information window will open, displaying the webOS version along with additional system details.