Remote HTTP Events Remote HTTP Events let you control content on one screen using another device. For example, you can use a touchscreen tablet to launch videos or slideshows on a nearby screen, like an Android TV.
This setup is ideal for interactive kiosks, customer-facing displays, showrooms, and event installations.
NOTE: Remote HTTP Events are supported on Android devices only .
How It Works Trigger device: : An Android touchscreen device (tablet or screen) used to send commands
Receiving device: Any Android device running the NoviSign app (for example, Android TV or an Android player connected to an LED screen)
Network: Both devices must be on the same local network.
Control: You can trigger content on one or multiple screens at the same time.
Technology: Commands are sent over the local network using HTTP, which is whythey are called Remote HTTP Events
If you are setting this up with LED screens, make sure your screen and player configuration is completed first. See our guide: How to Set Up Interactive LED Screens in NoviSign .
Step-by-Step Setup Prepare the Receiving Device (e.g., Android TV)
This is the screen where the triggered content will be displayed.
A. Configure the NoviSign App: Install the NoviSign APK on the Android TV.
Open the app and click the gear icon (top-right corner) to access Settings.
Scroll down to the “Advanced” section:
Scroll to the “API Server” section:
Note down the Device’s IP Address and Port displayed in the settings. (Use the first IP if two are shown.)
B. Set a Static IP on Android TV: C . Final App Setup Return to the NoviSign app On the welcome screen, check “Start automatically after reboot”. Login to your Studio account (top-right corner). Click the magnifying glass icon, choose your screen, and press Go to start downloading content. After the content starts playing, right-click to stop playback.
In Settings → Display , turn off Display Notifications .
Press Go again to restart playback.
Your receiving device is now ready. Actual content setup happens next.
Create Content in Studio for the Receiving Device
Create a playlist:
For each event-triggered creative :
In the playlist editor, click the calendar/schedule icon of that creative.
Check the “Events” checkbox.
Select the event from the list.
Can’t find the event? Contact support to assign it to your account.
Also check “Play only on events”.
Click OK and then Update to save.
Go to the Screens tab and assign this playlist to the receiving device.
Set Up the Sending Device (e.g., Android Tablet)
This is the touchscreen device that will act as your remote control.
Create a creative that includes one or more “button” elements (image, text, video, or label).
Add the element and open its properties.
Expand the “Touch” section and choose the action “Send event to player”.
Fill in:
Player IP : Enter the local IP of the receiving device.
Player Port : Enter the port number you noted earlier.
Event : Choose the same event you assigned to the creative on the receiving unit.
Using a different Studio account? Ask support to assign the same event to your account.
You can repeat this step to add multiple buttons, each triggering a different event (and therefore a different creative on the other screen).
Add this creative to a playlist and assign it to the sending unit.
VIDEO
Setup complete 
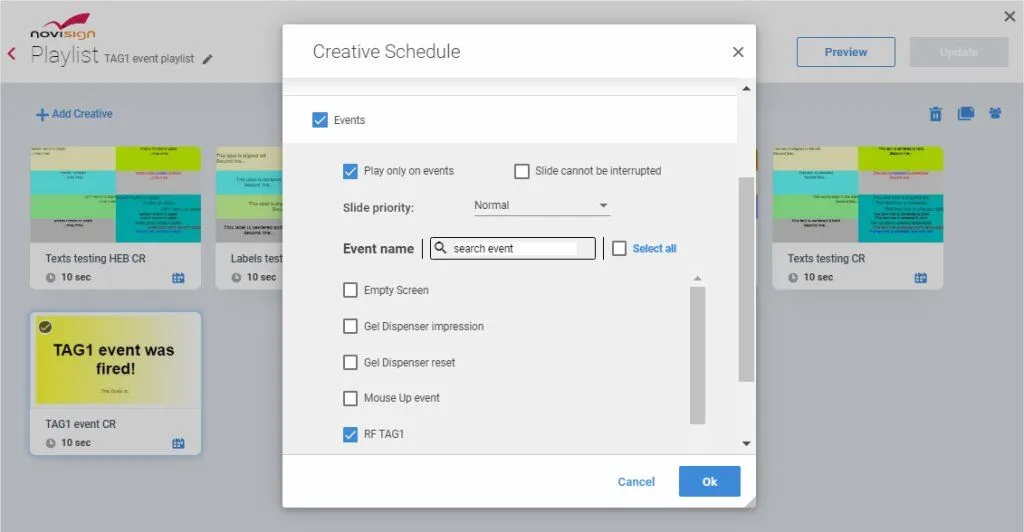
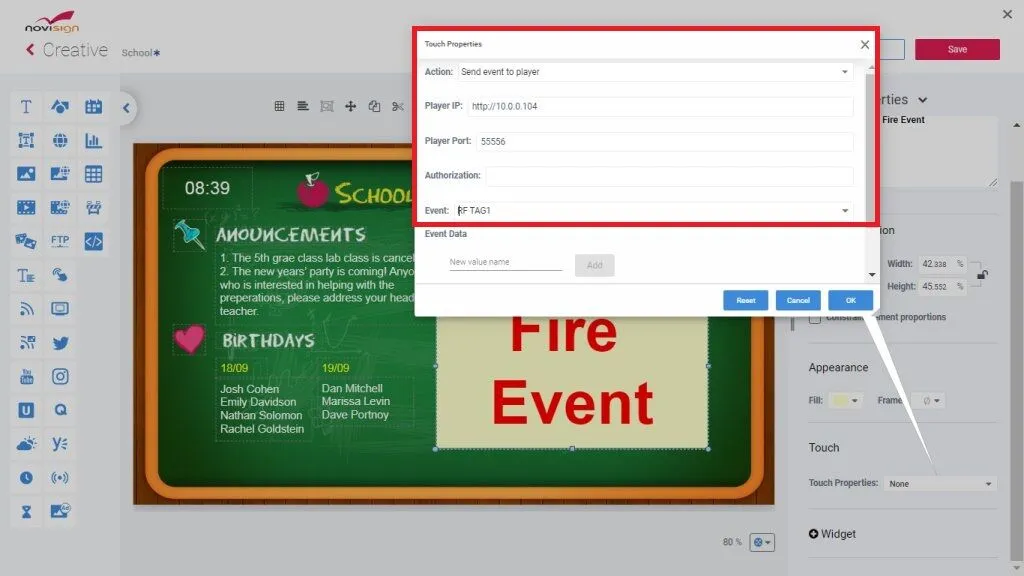
Now, simply tap the button on your Android tablet (sending device), and the assigned content will play on the Android TV (receiving device).
You’ve successfully created a real-time, touch-to-display system using Remote HTTP Events.