
Remote HTTP Events let you control content on one screen using another device. For example, you can use a touchscreen tablet to launch videos or slideshows on a nearby screen, like an Android TV. This is perfect for interactive kiosks, displays, or customer-facing setups.
Remote HTTP Events
NOTE: The following instructions apply only for Android devices
How It Works
-
Trigger device: Use an Android touchscreen (recommended for simplicity).
-
Receiving device: Any screen running NoviSign (e.g., Android TV).
-
Network: Both devices must be on the same local network.
-
Control: You can trigger content on one or multiple screens at the same time.
-
Technology: Commands are sent over the local network using HTTP, which is why we call them “Remote HTTP Events.”
Step-by-Step Setup
This is the screen where the triggered content will be displayed.
A. Configure the NoviSign App:
-
Install the NoviSign APK on the Android TV.
-
Open the app and click the gear icon (top-right corner) to access Settings.
-
Scroll down to the “Advanced” section:
-
Enable “External Interfaces”.
-
Enable “RF ID Reader” (this allows the device to receive keyboard-like triggers).
-
-
Scroll to the “API Server” section:
-
Turn on “Connection Parameters” to allow HTTP events.
-
-
Note down the Device’s IP Address and Port displayed in the settings. (Use the first IP if two are shown.)
B. Set a Static IP on Android TV:
-
Exit the NoviSign app and go to Android network settings
-
Assign a static IP address using the IP you noted earlier.
C . Final App Setup
- Return to the NoviSign app
- On the welcome screen, check “Start automatically after reboot”.
- Login to your Studio account (top-right corner).
- Click the magnifying glass icon, choose your screen, and press Go to start downloading content.
-
After the content starts playing, right-click to stop playback.
-
In Settings → Display, turn off Display Notifications.
-
Press Go again to restart playback.
Your receiving device is now ready. Actual content setup happens next.
-
Create a playlist:
-
Add regular creatives to loop normally.
-
Add event-triggered creatives that will only appear when triggered by an event.
-
-
For each event-triggered creative:
-
In the playlist editor, click the calendar/schedule icon of that creative.
-
Check the “Events” checkbox.
-
Select the event from the list.
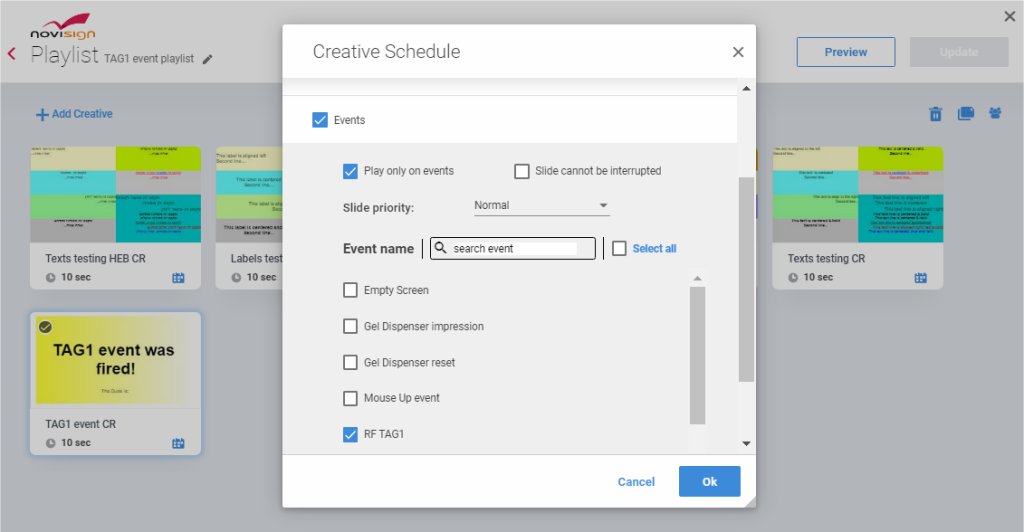
Can’t find the event? Contact support to assign it to your account.
-
Also check “Play only on events”.
-
Click OK and then Update to save.
-
-
Go to the Screens tab and assign this playlist to the receiving device.
-
Within 2 minutes, the screen should update.
-
This is the touchscreen device that will act as your remote control.
-
Create a creative that includes one or more “button” elements (image, text, video, or label).
-
Add the element and open its properties.
-
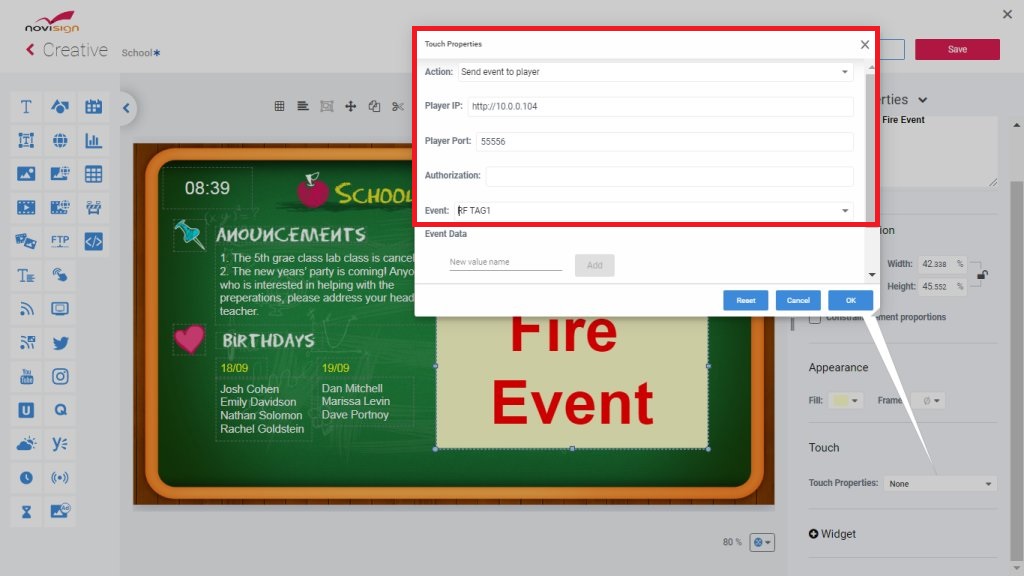
Expand the “Touch” section and choose the action “Send event to player”.
-
Fill in:
-
Player IP: Enter the local IP of the receiving device.
-
Player Port: Enter the port number you noted earlier.
-
Event: Choose the same event you assigned to the creative on the receiving unit.
Using a different Studio account? Ask support to assign the same event to your account.
-
-
You can repeat this step to add multiple buttons, each triggering a different event (and therefore a different creative on the other screen).
-
Add this creative to a playlist and assign it to the sending unit.
-
Within 2 minutes, content should be updated on the touchscreen.
-
Setup complete
Now, simply tap the button on your Android tablet (sending device), and the assigned content will play on the Android TV (receiving device). You’ve successfully created a real-time, touch-to-display system using Remote HTTP Events.