The Touch Widget allows you to create an interactive kiosk experience directly within your digital signage content—without requiring a constant internet connection.
Previously, interactive kiosk functionality was achievable using the Webpage Widget, which depends on a live internet connection. In contrast, the Touch Widget provides offline interactivity by letting you define multiple clickable areas on the canvas (within a composed creative). Each touchpoint can trigger a different creative of your choice.
The Touch Widget is supported on Android and Windows player apps, version v4.3.93-0-97 and above.
Available Touch Interactions in NoviSign
The Touch Widget is one of several touch-based features offered by NoviSign. Here’s a list of all supported touch capabilities:
Embedded Webpage Widget – Allows users to interact with a webpage as if browsing from a PC, offering kiosk effect.
Slide Navigation – Navigate between slides in your playlist using touch gestures (available in Android and Windows player settings).
Important: Only one touch capability should be used per creative to avoid click conflicts. For Android tablets and touchscreens, we recommend setting “Hide Action Bar” (under the “Display” section) to Off to prevent double touches.
Using the Touch Widget
The Touch Widget lets you divide your screen into interactive zones:
Drag and drop the Touch Widget onto your canvas.
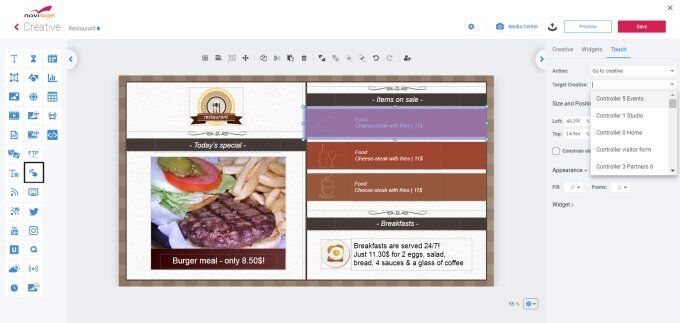
Set a Target Creative that will be displayed when the touch area is clicked.
Define the Target Duration (in seconds), or leave it empty to use the creative’s default duration.
You can place multiple Touch Widgets in one creative to trigger different creatives. After a triggered creative completes its duration, the playback returns to the original creative that started the touch event chain.
Example Scenario:
Creative A has two Touch Widgets:
One triggers Creative B (15s duration).
One triggers Creative C (15s duration).
Creative B has a Touch Widget that triggers Creative D (20s duration).
How it works: On a running on an Android tablet a user touches the widget in Creative A to launch Creative B. If he waits 15 seconds (the duration of Creative B), he will be taken back to Creative A. However, if in less than those 15 seconds, he will touch the touch widget in Creative B, it will take him to Creative D. In Creative D, when the duration is over (20 seconds), he will be taken back immediately to the first creative which initialized this chain, that means to Creative A.
Note: All creatives used in touch navigation must be added to the playlist. When editing the playlist:
Assign a Touch Widget Event to each involved creative or can be called by a touch widget from another slide.
Check the “Play only on events” box for creatives that should only appear in the playlist ONLY when are called by a touch event These settings are accessible via the Scheduling icon (calendar/clock symbol) on each slide.
Touch Properties in All Widgets
In addition to the Touch Widget, every widget in the Creative Composer includes Touch Properties. This means you can apply interactive behaviors to any widget—image, video, label, etc.
To access them:
Go to the right-side Properties/Layout pane in the Creative Composer.
Locate the “Touch Properties” section (default is “None”).
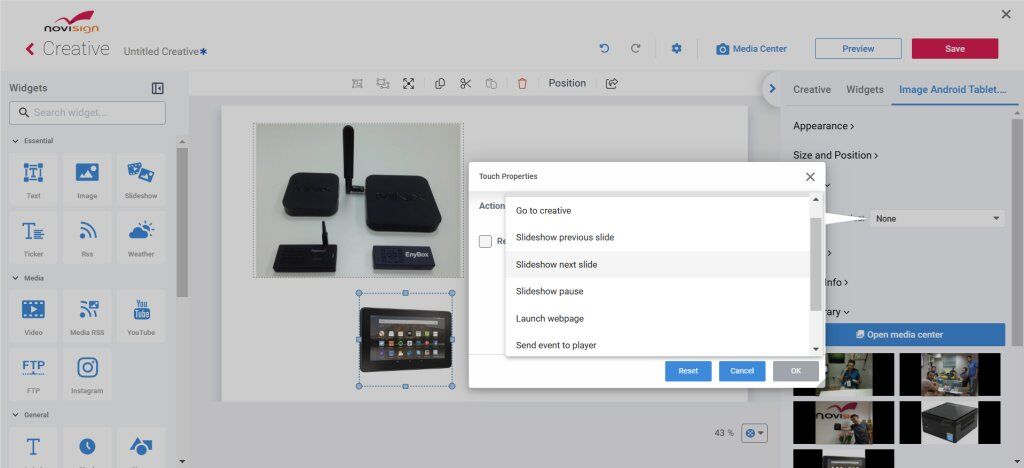
Click the dropdown to explore 8 available touch actions.
Use the Reset button to revert back to “None.”
Except the “OK” and “Cancel” buttons in this popup window of the touch properties
The touch properties include 8 possible actions:
Go to creative:Clicking this one will move the user from this creative to the target creative. Please remember to add the target creative within the playlist, and in the playlist (in edit mode) set the “Touch event” to that target creative, and also check the “Play only on event” checkbox for that event (so the target creative will appear only when being triggered and not as part of the regular playback).
Slideshow previous slide:When choosing this option you also get to choose a “Target Slideshow”. What will happen is that once the user touches this widget, then the target slideshow widget (within this creative) will move from its current displayed slide to the previous slide. Like paging back.
Slideshow next slide:When choosing this option you also get to choose a “Target Slideshow”. What will happen is that once the user touches this widget, then the target slideshow widget (within this creative) will move from its current displayed slide to the next slide. Like paging forward.
Slideshow pause:When choosing this option you also get to choose a “Target Slideshow” and a “Slideshow pause duration” (in seconds). What will happen is that once the user touches this widget, then the target slideshow widget (within this creative) will remain static on its current displayed slide for the duration you have set. Like freezing it.
Launch website:Choosing this option will open a website which will replace your creative for the duration which you set in the “Auto close” textbox (which is checked by default). If you uncheck this checkbox, the website will remain. 2 other controls which appear once you choose this option are the “URL” (where you set the URL of the target website) and “Titlebar” (the title which will appear on top of that website).
Send event to player:Choosing this option will send a remote HTTP event to target screen(s) by their IP address(es). You can read more aboutfiring remote HTTP event in this page.
Launch application:Choosing this option will launch a 3rd party app to run instead of NoviSign’s player app. In the “Application name” you can put a package name (in case the running player will be Android based) or an EXE file name with its full path (in case the running player will be Windows based). You can also add a set of parameters to be sent to that 3rd party application.
HTTP request:Choosing this option allows you to send an HTTP classic request to any chosen URL.
Additional Features in Touch Properties
Report clicks on this widget:Checking this checkbox will make this widget to appear in a daily sent CSV report, in case you set this creative to “collect statistics”.
Aggregate clicks on this widget:Checking this checkbox (will appear only if you checked the previous checkbox) will allow you showing how many people clicked on this widget, in a special counter made by a label widget with data expression. Example: if you gave the name “MyWidgets” to 2 different creatives in the very same user account in the “Aggregate name” textbox (i.e. image of Coca Cola and image of Pringles), then if you like to show the aggregated click count of those 2 in all possible devices, you’ll have to use the label widget and put this data expression there:${CLICKS.MyWidgets} If the aggregation name is “CoolWidgets“, the data expression shall be:${CLICKS.CoolWidgets} This data label counter is supposed to be updated every ~20 minutes from the server.
Watch Video Tutorial
Watch our step-by-step tutorial for a quick visual guide on how to set up and use the Touch widget, start from 04.45: