How to Configure Your NoviTizer (Digital Signage Hand Sanitizer)
How to Configure Your NoviTizer (Digital Signage Hand Sanitizer)
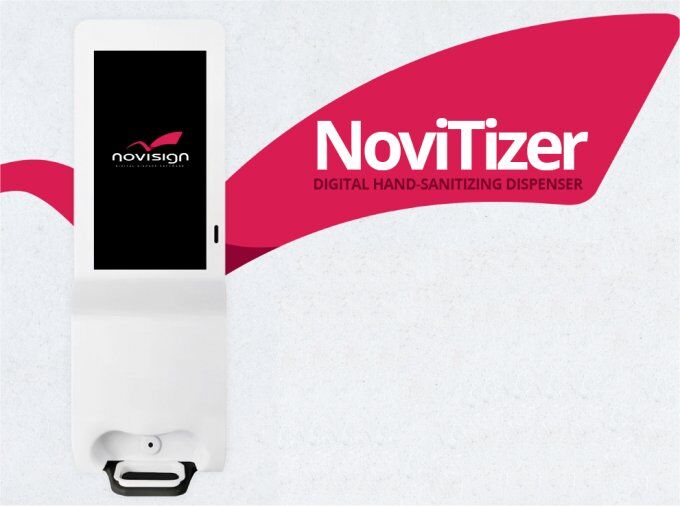
What Is NoviTizer – The Digital Signage Hand Sanitizer?
If you’ve purchased the NoviTizer (also known as “NoviSanitizer”), a digital signage hand sanitizer kiosk, this section explains how to configure it and highlights the added capabilities it offers.
The NoviTizer typically comes with LAN/Wi-Fi connectivity, and optionally, a 3G SIM slot for cellular connection. While some models include a touch screen, it’s important to note that users often avoid touching the screen after using the sanitizer.
Enhanced Features with PCB
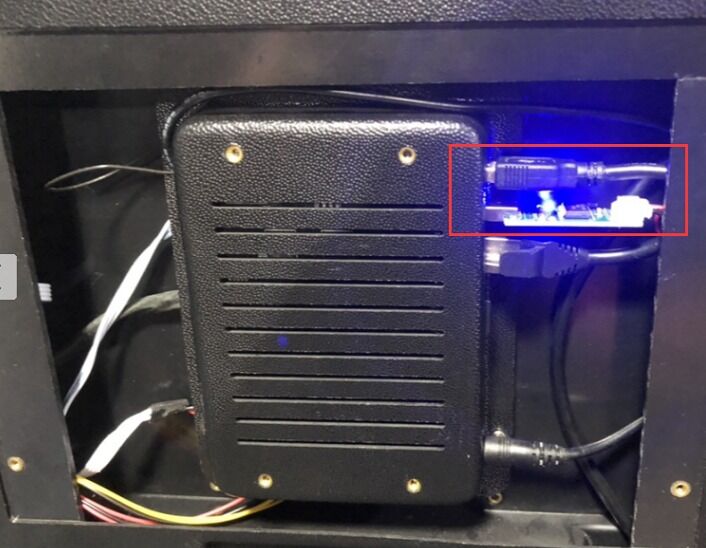
When the NoviTizer includes a PCB (Printed Circuit Board) a small internal electronic card, it unlocks additional functionality by allowing the Android device to detect sanitizer-related activity as keyboard events. This makes your digital signage setup smarter and more interactive.
We highly recommend choosing a NoviTizer model with the PCB installed, as it allows the built-in Android device to detect gel dispenser activity as keyboard events. This unlocks powerful capabilities within the NoviSign app.
The PCB box is a small electronic card installed inside the NoviTizer. It connects the Android player with the gel dispenser and gel tank, allowing them to communicate through keyboard events.
This is what makes all the advanced features possible.
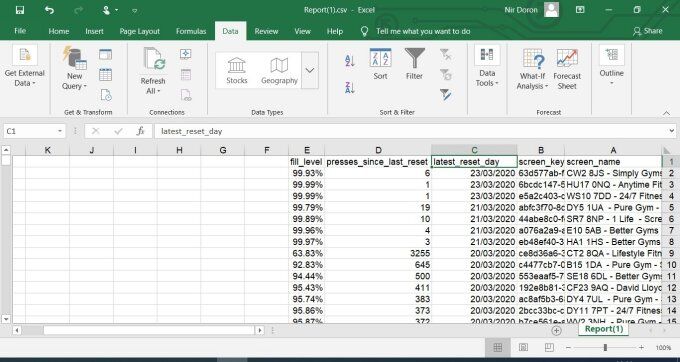
Track how many times the gel dispenser is used. You can even receive daily CSV reports with usage data per NoviTizer.
View events like gel tank replacement or dispenser usage in the Monitoring & Reports > Events Report section of your NoviSign CMS.
Automatically receive an email notification when gel usage reaches 90% capacity, so you can proactively dispatch a technician for refilling.
React to real-world actions with tailored screen content. For example:
Show an ad or message when someone uses the gel dispenser.
Display a thank-you message when a technician replaces the gel tank.
These actions are configured using NoviSign’s Events Engine, which responds to the PCB-generated keyboard events. You can easily set up event-triggered slides in your NoviSign CMS based on gel dispenser activity or tank replacement.
How Do I Set it Up?
Follow these steps to set up your NoviTizer (digital signage hand sanitizer unit) and connect it to your NoviSign account.
Before you start working with the device:
Create portrait-mode content in your Studio account.
Create a new screen and assign the content to it.
Contact us and ask to enable the following two events for your user account:
Gel Dispenser Use
Gel Tank Replacement
Once we confirm the events are set for your account, you can proceed with the device setup.
Connect a mouse to the USB port at the back of the NoviTizer unit (You may need to open the back door to access it).
Plug in the unit and wait for the Android system to boot up.
Open the Android Settings and configure:
Connect to the internet (Wi-Fi or LAN).
Set date and time manually and ensure timezone is set to automatic (from network).
Disable power-saving options (to prevent the screen from sleeping).
(Optional) Log into the Google Play Store with a Gmail account if you need to download any apps.
Make sure the NoviSign app is installed (preferably the latest version). 👉 Download the latest APK (use the first APK file listed).
Launch the NoviSign player app.
In the orange welcome screen, click the gear icon (top-right corner) to enter the app’s settings.
Adjust the following settings:
Connectivity
Enable SSL Connection (optional, for secure communication)
Play Mode
Set “Skip Incomplete Slides” to off
Set “Skip Slideshow Incomplete Slides” to off
Turn on “Restart on Inactivity”
Advanced
Under “External Interfaces”, enable “RF ID Reader” (this allows the app to listen to keyboard events, which the gel dispenser uses)
Exit settings by right-clicking twice to return to the orange welcome screen.
You should now enter the screen key for this device. You can do this in one of two ways:
Option 1: Log into your Studio account inside the app (use the controls near the gear icon) → click the magnifying glass next to the “Go” button → choose your screen from the dropdown list.
Option 2: Manually type or paste the screen key in the text box.
Check the box “Start automatically…”
Click “Go” – the app will download your content and begin playback.
Let the content run through one full cycle.
Right-click, enter settings again, and disable “Display Notifications” (found under the “Display” block) to prevent system messages from showing on screen.
Exit settings and press “Go” again to resume playback.
Disconnect the mouse and close the back door (if opened).
To ensure proper tracking of gel usage:
Remove the gel tank and insert it again. This resets the usage counter and sets the tank’s start date.
In the future, if you refill the gel without removing it, you must still take it out and reinsert it to reset the counter properly.
Watch a Tutorial Video
Here is a short video of how to setup your NoviTizer’s initial settings:
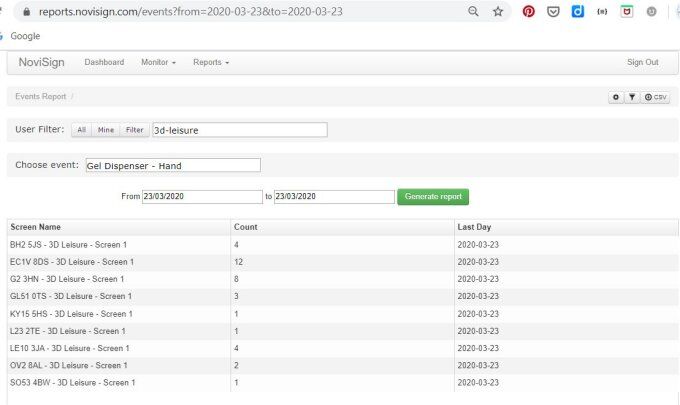
Viewing Events in Monitoring & Reports
Once your NoviTizers are up and running, you can track their activity daily in the Monitoring & Reports tool under “Events Report.”
Here’s how to view the data:
Go to the Events Report section in your Studio account.
Select the date range (note: reports do not include data from the current day).
In the search field, type the relevant event:
"Gel Dispenser – Hand" to view dispenser usage.
"Gel Dispenser – Reset" to view gel tank replacement/refill.
Click “Generate Report.”
You’ll see a list of all events across your NoviTizer units.
Triggering Content Based on Events
Want to display specific content when someone uses the dispenser or replaces the tank? You can easily set this up using NoviSign’s Events Engine.
Example Use Cases:
Show a thank-you message when someone replaces the gel tank.
Display a health tip or ad when someone uses the gel dispenser.
How to Set Up Event-Triggered Content
Follow these steps in your Studio account:
1. Prepare the Playlist
Create a new playlist with at least two creatives:
A thank-you creative (for gel tank replacement)
An information/ad creative (for gel dispenser use)
2. Configure the “Thank-You” Creative
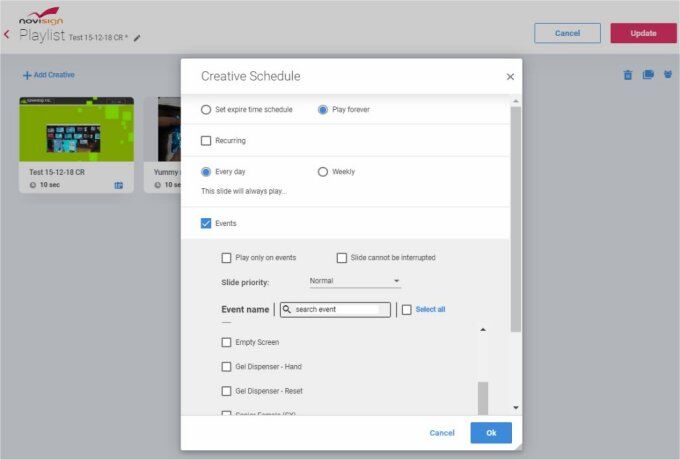
Open the playlist in edit mode.
Click the datetimepicker icon on the thank-you creative.
In the scheduling window:
Check the “Events” checkbox.
Scroll and select “Gel Dispenser – Reset.”
Check “Play only on events.”
Click “OK” to save.
3. Configure the Information/Ad Creative
Click the datetimepicker icon on the info/ad creative.
In the scheduling window:
Check the “Events” checkbox.
Select “Gel Dispenser – Hand.”
Check “Play only on events.”
Click “OK” to save.
4. Save and Assign
Click “Update” to save the playlist.
Go to the Screens tab and assign the playlist to your NoviTizer screen.
That’s it! Your NoviTizer will now display custom content based on real-world gel dispenser interactions.
Keep It Smart, Clean, and Interactive
With event tracking and dynamic content, your NoviTizer isn’t just about hygiene—it’s a smart tool for engagement and communication. Let’s beat viruses like COVID-19 and promote wellness through better digital signage!