Before diving into the setup process, it’s important to clarify what the term “kiosk” refers to in this context.
There are two meanings:
-
Kiosk Mode – A unit is dedicated 24/7 to running a single app.
-
Kiosk – An interactive digital signage unit intended to serve visitors, similar to a real kiosk shop.
To learn more about the differences, you can read this article.
In most cases, these two terms are used together.
For example, you may have a kiosk (interactive, usually touch-enabled) that needs to run only the kiosk app — this is when kiosk mode becomes essential.
To create an interactive kiosk, it’s essential to become familiar with NoviSign’s touch functionality.
For a deeper understanding of kiosk mode setup, continue reading below.
To explore the difference between “kiosk” and “kiosk mode”, refer to this article.
1. Install the NoviSign App
2. Configure the NoviSign App
-
Check the “Start automatically…” box so the app starts after reboot
-
(If needed) Enable “Restart on Inactivity” under Play Mode, for devices where auto-start is blocked by firmware.
-
Set the appropriate “Video to Video Transition” setting under Display: go to the NoviSign app’s settings by tapping the gear icon in the top right corner of the app’s main screen. Under the “Display” section, find the “Video to Video Transition” option and adjust it if your Android device requires a different setting than the default (“Auto/Performance”).
-
Enter the Screen Key by:
-
Press “Go” and let media fully download.
-
Watch one full playlist cycle.
-
Turn off “Display Notifications” under Display to hide system messages from viewers.
3. Install the Kiosk App
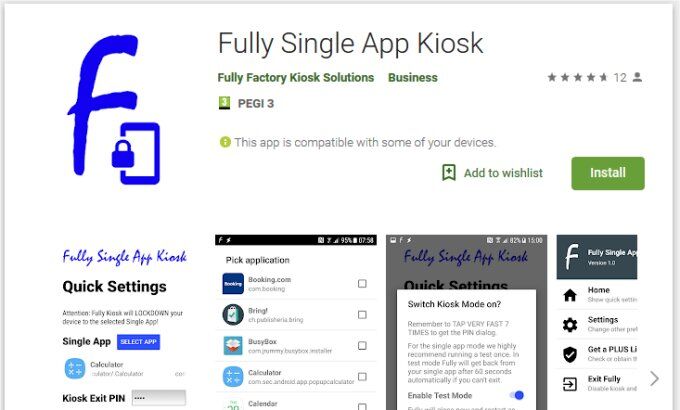
4. Configure the Kiosk App
-
Tap “Select App”, choose “NoviSign”, and press OK.
-
Type a secret PIN code, near the “Kiosk Exit PIN” and remember it. Using this PIN in the future, will let you exit the kiosk mode (that is done by tapping the screen fast 7 times, in order to get the PIN dialog and then exit the kiosk mode).
-
Press “Start Kiosk Mode” button.
-
Turn off “Enable Test Mode”, then press Yes.
-
Choose the “Fully Single App Kiosk” as your new Android launcher and press “Always”.
5. Final NoviSign Settings
You’re Done!
Now your device is fully locked in kiosk mode.
Even if someone tries to exit the app or press system buttons (the system/action bar), the NoviSign app will stay active and simply restart the playlist.